Showing posts with label independent film. Show all posts

Tuesday, September 15, 2015

NOS Eighties Music Video from Story of the Running Wolf “Electric”

Nobody, and I mean nobody, is doing “new old stock” 80’s music like Story of the Running Wolf.

In their latest rehash/remake/re-love video from my favorite music era, SOTRW revisits Weird Science, with two adolescent kids creating a beautiful woman from synth parts and mannequin limbs.  I especially appreciate the effort they put into showcasing old tech (monochrome monitors, 5.25” floppies (they actually BEND!), et al).  It’s glorious.

The video was produced and directed by Bruce Driscoll and Marie Seyrat for Pyromantra Productions.  If those names sound familiar to you it may be because they are the band Freedom Fry (you should go getchaself summa that too)! http://www.freedomfrymusic.com/

If you EVER get a chance to see these guys live… DO. IT.  They are amazing --which is especially impressive for 80’s (mostly electronic) music.  Here’s a review I posted after I last caught them at the Sayers Club in LA: http://danbeahm.blogspot.com/2013/06/stratospheric-new-video-from-story-of.html

And if you didn’t see their last video for “Stratospheric” (a wonderful mashup of Labyrinth and Never Ending Story themes), check it out at: https://youtu.be/ZhrbEOPv5-k

Various credits and links for the “Electric” video:

Directed by Bruce Driscoll and Marie Seyrat for Pyromantra Productions.
iTunes: https://itunes.apple.com/us/album/ele...
Bandcamp: http://storyoftherunningwolf.bandcamp...
Soundcloud: https://soundcloud.com/storyoftherunn...
Download the single "Electric" free on Soundcloud: https://soundcloud.com/storyoftherunn...
Twitter/Instagram: @sotrw
Facebook: https://www.facebook.com/Storyoftheru...

Wednesday, June 10, 2015

Red Giant MisFire Setting Definitions

The problem with MisFire is that I have NO IDEA what the different settings of each thing do.  I end up having to look stuff up every time, and when I do, I usually end up at this page, so I’m reposting here (basically so it’s easier for me to find!).

Major props to whomever posted this information online at:

http://www.aemoban.com/Source_Files/AE-misfire.html

I can’t figure out what the aemoban site is (the top tier is in Chinese), so I’m reposting the information here (because who knows when that page will disappear).  No copyright infringement intended.  Just making the information available to the filmmaking community!

=====================

MisFire Plug-ins

MisFire adds a host of tools to your effects arsenal to simulate film damage. The main MisFire plug-in is a single complete tool that offers 13 different effects. Each category of effect can be turned off individually using the category switch. The effects are: Fading, Funk, Splotches, Dust, Flicker, Vignette, Displacement, Grain; and 3 different types of scratches, Microscratches, Basic Scratches and Deep Scratches.

The main MisFire plug-in is accompanied by individual plug-ins for each effect category. For example, if you only want to apply grain and basic scratches, you can apply these as individual effects called Misfire Grain and Misfire Basic Scratches.

MisFire plug-ins are not a perfect duplication of every type of film defect. Film defects are wide ranging in their appearance and include problems caused by dust, dirt, film wear, duplication problems, splicing, irregular exposure or improper storage of the film medium. These defects can show up in the frame or be caused by improper projection. MisFire attempts to artistically emulate a number of these defects.

clip_image001


MisFire Fading

Fading causes an overall lightening of your image that is exhibited as lower contrast.

Fade Amount: The default value is 100, lower values will lessen the effect.

clip_image002

clip_image003


MisFire Funk

Funk provides for tone variation across the frame. This simulates a film negative with lightness variation across the entire frame that may be caused by improper storage or in an environment where fungus or mildew could form. This is similar to the splotches but occurs throughout the frame and will persist from frame to frame.

Funk Opacity: The default is 15%. High values may look unnatural but feel free to adjust to taste.

clip_image004

clip_image005


MisFire Splotches

Splotches manifest as a local dirtiness or discoloration of the frame. This can happen on any frame and will usually only persist for a frame or two at a time.

Number: Controls the number of splotches on any given frame where the scale controls the size. The Scale value at 1.0 will cover about 40% of a standard DV-size frame or about 16% of a 2K film frame.

Transparency: Controls the darkness of the discolored areas. You may need to lower the value on very bright footage (to make the splotch less prominent) or raise the value for very dark footage to bring out the effect.

Frequency: Determines how often a splotch will appear in a sequence. The default value of 50 will cause a splotch to appear on half of the frames. Try lowering this value if you want the splotches to occur less frequently.

clip_image006

clip_image007


MisFire Dust

Dust essentially draws bits of black and white material onto the frame. This is effect is similar to the small particles that appear on film that has been run through a projector numerous times. The defaults are meant to generate a small amount of both black and white dust that is very noticeable.

NOTE: While a number of categories include a Frequency control, each category determines its frequency separately, so splotches won’t necessarily appear at the same frame as dust or any other category of effect.

Black Dust Amount, White Dust Amount: Control the maximum number of black or white dust particles appearing in any one frame. For large frame sizes, you may want to make this value much larger to increase the appearance of the dust.

Opacity: Specifies the transparency of the dust particles. The default is 100%, which makes the particles quite noticeable. If you want the dust to look smaller in the frame, try lowering this value to between 40 and 60%.

Frequency: Determines how often a dust particle will appear in a sequence. The default value of 50 will cause dust particles to appear on half of the frames. Try lowering this value if you want the dust to occur less frequently.


clip_image008

clip_image009


MisFire Flicker

Flicker causes the image brightness to change from frame to frame. This is similar to the uneven brightness caused by the degradation of an old print.

Frequency: Operates the same as in the Dust or Splotches categories, where the value specifies the percentage of frames in a sequence that will have change. The default value of 50 means that half of the frames in a sequence will change in brightness.

Flicker Amount: Controls the degree of brightness change. The default of 10 will cause only a small variation.

clip_image010

clip_image011


MisFire Vignette

Old film tends to exhibit a lot of darkening around the edge of the frames, which is often a result of the lens and camera that were used to shoot the film. Vignette will mimic this aberration. Unlike other MisFire effects, Vignette does not animate or change from frame to frame.

NOTE: Magic Bullet Looks includes an integrated Vignette tool that you can use as a replacement for MisFire Vignette. The two produce similar results but Looks' Vignette can be integrated into a Look rather than applied separately.

Size: Controls the overall width of the darkening where a value of 0 will darken all the way to the center and value of 100 will not darken the frame at all.

Intensity: Simply changes the amount of darkening.

clip_image012

clip_image013


MisFire Displacement

Often old or mishandled film prints can exhibit a warping of the image caused by a physical bend in the film frame itself. Displacement offers a very simple control for warping the image.

Amount: Specifies the level of warping in the image. With this control, a little goes a long way. This category of effect does not auto-animate so you may want to keyframe the Amount value.

clip_image014

clip_image015


MisFire MicroScratches

MisFire offers 3 different styles of scratches. MicroScratches are very thin, faint black lines across the entire image. Film is often scraped as it run through a projector, creating faint black lines on the frame, and this damage is what is replicated.

Number: Does not correspond to the number of scratches, but instead is a measure of the density of the scratches—higher numbers yield a denser field of black lines.

Opacity: Changes the transparency of the lines. The Number and Opacity controls should be adjusted in tandem. If you raise the Number control, you may want to lower the Opacity, or vice versa.

clip_image016

clip_image017


MisFire Basic Scratches

Basic Scratches generates thin bright or dark lines that wiggle or move from frame to frame. Unlike the MicroScratches or Deep Scratches effect, Basic Scratches will not cover the entire frame but will gently fade toward the top or bottom of the frame.

Number of Scratches: The specified number of scratches that will be drawn on the image.

Maximum Duration: Controls the maximum length that any one scratch will appear on the image. The duration is determined randomly for each scratch and can be between 1 frame and the maximum specified number of frames.

Invert: Lets you specify either dark lines (when it is on) or light lines when it is off.

clip_image018

clip_image019


MisFire Deep Scratches

Deep Scratches generates a colored scratch that appears to have depth, and to wiggle or move from frame to frame. This colored scratch mimics a physical scratch on the film that has removed some of the film resist, letting light through that is pure in color. The scratches can shift left or right by a random amount that varies from 0 to 5-7 pixels, depending on the size of your image.

Number of Scratches: The specified number of scratches that will be drawn on the image.

Maximum Duration: Controls the maximum length that any one scratch will appear on the image. The duration is determined randomly for each scratch and can be between 1 frame and the maximum specified number of frames.

Tint Color: Specifies the color of the scratches. The default color is close to pure green, which is the color of real scratched film.

clip_image020

clip_image021


MisFire Grain

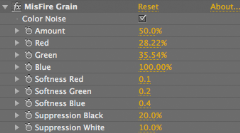
When most people think of film, they think of grain. While some film stocks do exhibit noticeable grain, this type of effect is best used sparingly. The Grain category generates more than just random noise. If all you want is random noise, a simply noise filter applied on top would work fine. The Grain controls go beyond this by letting you create the multi-colored clumps associated with true film grain. Grain offers ten different controls for specifying the amount of grain and where it appears on your image.

NOTE: Magic Bullet Looks includes an integrated Film Grain tool that you can use as a replacement for MisFire Grain. The two produce similar results but Looks' Film Grain can be integrated into a Look rather than applied separately and its speed is generally 3-4 times faster.

Color Noise: Lets you simply specify whether the grain is the same on all the color channels Red, Green and Blue. This control is on by default. If you turn it off, you will notice that the colored grain disappears and is replaced by a tinted noise, based on the Red, Green and Blue percentages.

Amount: Gives you control over the density.

Red, Green, Blue: These three controls specify how much grain appears and how soft it is. The Red, Green, and Blue controls are specified as a percentage and these bias the Amount setting. For example, the Red control defaults to 28.22%. This means that only 28.22% of the Amount value is used in the Red channel of your image. If these values are all the same, then the grain will have the same amount applied to each channel. They are interrelated and related to the Softness controls.

Softness Red, Softness Green, Softness Blue: These three controls let you soften the grain on each color channel. Smaller values mean harder edges, larger values add a more diffuse look. It is best to stick with small values in these controls. They are interrelated and related to the Color controls.

Suppression Black, Suppression White: These two controls determine whether the grain is drawn in purely white or black areas . The percentages specify the percentage of brightness or darkness in the frame where the grain will NOT appear. For example, 10% Suppression White means that the grain will not draw in the very brightest pixels in the image and will only appear fully in areas that are 10% or less of fully white pixels.
clip_image022

clip_image023


MisFire Gate Weave

When a film frame passes through a projector, sprockets outside the image area control the vertical motion of the frames through the projector. Over time, a film can be become warped or the sprockets can wear, causing the frame to appear to move side to side. This kind of motion is called Gate Weave and this effect mimics it.

Weave Frequency: Controls the speed of the left-right motion of the frame. Small values cause the frame to move slowly. High values will cause the frame to move quickly from side to side.

Amplitude: Measured in pixels. The default of 5 pixels will cause the frame to move left or right 5 pixels then return to center.

Noise Frequency: Varies the motion by the percentage you choose. Small values will cause a slight variation of the motion, while large values will cause the frame to appear to jitter.

clip_image024

clip_image025


MisFire Post Contrast

Film often appears with higher contrast than video. Over time the darkening or contrast change can be quite pronounced. The Post Contrast control lets you quickly add this effect.

Contrast: Applies a darkened high contrast effect. The default value is fine in most cases. Values beyond 50 will likely look unrealistic. Negative values can cause the image to appear to wash out.

clip_image026

clip_image027


Sunday, November 2, 2014

CowboyStudio Universal Heavy Duty Tripod Dolly FT9911

20141102_154630I purchased my Cowboy Studio Heavy Duty Tripod Dolly for $90 from Amazon here

Currently I am using it with a Bogen/Manfrotto 3046 tripod that I use as the base for a 12 foot Kessler Crane.  A “real” heavy duty tripod with wheels for my crane would be nice, but this is working for now.

As with so many of these inexpensive DSLR Filmmaking items coming out of China, this appears to be the same (rebranded) item as Fancierstudio Universal Heavy Duty 150lb Max Video Cinema Film Studio Tripod Dolly FT9911 and ePhoto Universal Heavy Duty 150LB Max Video Cinama Film Studio Tripod Dolly FS9911. I'm not sure if there is *actually* a difference between the FT9911 and the FS9911 (note the "T" and "S"). This one (CowboyStudio) is ten bucks less than the "Fancierstudio" and fifteen bucks less than the "ePhoto." Do not confuse these with the "NON-heavy-duty" dollies also available from these three brands for around thirty-five bucks.

I have to say, I'm pretty impressed with the build quality of this dolly. When it first arrived I set it up and put my tripod on it, then climbed on top of my tripod and saw little to no flex (I'm about 155lbs.). Of course, the wider the spread on your tripod, the closer the feet are to the wheels, and the more weight this thing can hold (if the weight is nearer the center there will be flex).

After I climbed down I mounted my 12ft. Kessler Crane on the tripod and loaded it up with a camera and counter weights, and it works great. Smooth rolling and no issue with that amount of weight. I am very pleased.

20141102_155228(shown with only the 8 ft. arm)

In the Amazon reviews of the other brands' products (assumed to be the identical item), someone mentioned that the spread is not adjustable, but it absolutely is. The dolly remains the same size, but the "foot clamps" slide back and forth on the three struts and can be clamped down at any point on the strut.

20141102_154729

20141102_154813

With the legs collapsed, the span on my tripod is around 24”.  That is about 6” shy of what the dolly can accommodate.  You should be able to get a tripod with a 30” spread onto the dolly without issue.  The outside diameter (wheel to wheel) of the dolly is around 35”, maybe a tad more, so you should be able to roll the dolly at it’s widest point through a 36” door opening.

 20141102_154647 20141102_155436 20141102_155520

The ~4" wheels are a good rubber, soft enough to absorb a little shock and roll smoothly but not *too* soft.  It also seems like they’d be pretty easy to swap out (just a nut and bolt) if anything ever went wrong with them, or if you wanted to use a different wheel.

20141102_155543

The dolly folds up nicely and comes with a sturdy, zippered nylon carrying bag.  At first I didn’t think I’d ever use the bag, but I’ve already used it several times and was happy to have it.  It’s surprisingly tough for a freebie.

20141102_155651 20141102_155700 20141102_160459

When you unfold the dolly and spread the struts, there is a bolt (with a knob) in the center that screws down to lock the struts in place (it doesn't just "click" into place). It seems plenty sturdy, and the dolly definitely can’t collapse with the pin/bolt screwed down.

20141102_155625

20141102_154826

I wish the wheel locks were metal instead of plastic, but they seem like they'll last at least a while if we're careful with them.

20141102_154852

For $90 (actually listed at $85 the day of this posting), I'm definitely impressed with this tripod dolly.

Wednesday, May 29, 2013

Authoring Mixed Aspect Ratio DVD’s in Adobe Encore

This is an old issue, but one that still comes up often enough for me.

I haven’t authored a 4:3 DVD in years.  This is because I haven’t seen a 4:3 screen in years.  Almost every television and computer monitor is now being made with a 16:9 (widescreen) aspect ratio.

However, we still delve into the archives often enough to find SD video that was shot 4:3.

When creating a widescreen DVD in Adobe Encore, these 4:3 videos usually wind up getting “stretched” on the screen to force 4:3 to conform to the 16:9 aspect ratio.  This is especially problematic when the video stretching makes your wife’s butt look wider than it actually is (doh!).  Thus, finding a solution was imperative.

For a specific example: I recently created a "wide screen" DVD of 20 or so archival live dance videos, along with some newer live dance videos as well as some dance for the camera pieces we had recently created.  Some of the archival videos were from quite a few years ago and had been shot 4:3, though most were shot 16:9.  When viewing the DVD (which is created as 16:9), there were still a few videos displaying 4:3 stretched to 16:9 rather than "pillar boxed" so there was no stretching.

Most of the clips were also rendered out of Premiere with the correct MPEG-DVD settings so that no transcoding was needed.  However, a few videos were still being transcoded by Encore, and this is where the problem was arising.

The solution for me was to go to those videos, right click on the video asset (not the timeline, but the actual video), "revert to original," and then "select transcode settings."  From here I could set the transcode setting as 16x9 HQ DVD instead of "automatic" so that the final video output was widescreen instead of the 4:3 that was getting stretched (Encore wants to leave a 4:3 original video as 4:3, which might make sense, but is not what we want for a 16:9 DVD!).

Hopefully this information helps someone find what they're looking for.

Monday, April 23, 2012

Universal Filter Holder (Cokin P Filter System) for DSLR Video

I’m not sure why universal filter holders aren’t discussed more among DSLR video shooters. They fill the role of the wildly overpriced Matteboxes (sans flags, of course) at nearly 1/100 of the cost (seriously!).  Purchasing screw-on ND filters for all your different lens sizes is a MAJOR cost for such a redundant item (buying the same filter for each of your different size lenses). You can use step-up/down rings so you only need one set of ND filters, but if you go this route, it’s a serious PITA to switch out the filters when you need to make adjustments (screwing each filter on and off).

Enter the universal filter holder.

41omZzNXl9L._AA160_When shooting photo stills I used to use the Cokin A filter system. Basically, there is a square holder that slides over a ring that screws into the front of your lens and can hold up to three filters. I recommend the “P” system for DSLR; it uses 84mm filters and can accommodate lenses up to 82mm in diameter. They actually make two even bigger sizes (intended for large format cameras), but these larger holders become cumbersome, and aren’t really necessary.  Supposedly the “P” system works great even with wide-angle lenses (I’ll be using this system with the Tokina 11-16mm on a cropped-sensor Canon 7D).

41xmAO7wDYL._AA160_A company called Lee also makes a higher quality, similar system, but the holder is WAY more expensive (close to $200 just for the holder), thus I’m going the Cokin route.  Actually, I’m going the Cokin knock-off route.  I see no reason to spend $50 on a plastic filter holder, when the knock-offs are the exact same quality, and cost only $12 on eBay or $16 on Amazon (and both places give you a filter and an adapter ring as well).  I can then get the appropriately sized Filter Holder rings for all my lenses and simply pop the holder onto whatever lens I’m using, thus making it possible to use one set of ND filters on all my lenses.

In the same way that I don’t recommend the actual Cokin filter holder, I also don’t recommend Cokin filters.  They’re made of resin, not glass, and they don’t effectively filter IR waves, which affect digital images much more than film.  These filters were fine for film photography, but in digital photography (and video) I’ve seen distortion and major color problems from the Cokin filters, especially when stacking multiple filters.

But I DO still really like the universal holder idea, especially since there are other manufacturers (like Lee, Singh-Ray, and Tiffen) making square filters for the Cokin P (84mm) system out of high quality optical glass.  Even Fotodiox is making square glass filters, though I assume of much lesser quality.  These Fotodiox glass filters are ND2 and cost only $6 a piece. I assume they are crap, but for $6… might be worth it to someone on a super-tight budget… at least to get you by until you can purchase a $250 Lee ND filter. Disappointed smile (yowch!)

UPDATE FROM EXPERIENCE IN THE FIELD: Using the Cokin P system has been rather frustrating. Before purchasing the much more expensive filters from Lee or Singh-Ray, I went ahead and used the cheap filters that came from eBay with the holders, knowing that the quality wouldn’t be great, but hoping they would produce an at least useable result.  No go.  They add a MAJOR color hue to the image when stacked.  Not only that, they soften the picture dramatically (they aren’t crystal clear).  I was using an ND4 and ND8 stacked for shooting in bright sunlight, and my images looked like poorly developed 8mm from 1972 (soft images with a major magenta color cast). Yes, I was able to color correct in Premiere or After Effects, but who wants to spend so much time color correcting when an ND filter is supposed to be just that… NEUTRAL?

Lee makes some great glass filters, but the price is astronomical, and I’ve read stories of people having to wait 6 weeks for their filter to arrive. Singh-Ray also makes a great quality ND square filter, but they are at least $150 a piece. Hitech is making less expensive filters ($27) using a resin they call C39 which evidently addresses IR better (the light wave causing the magenta color cast), but the reviews I’ve read state that even though they are consistently MUCH better than the Cokin equivalent (regarding the addition of magenta and blue hues), they still don’t cut it (still a magenta hue).  Tiffen also supposedly makes decent, less expensive glass filter that fits in the Cokin P filter holder, but I’ll be damned if I can find them anywhere.  I have yet to try the Fotodiox ND2 mentioned above, but I would need to purchase several and always stack all three to make them useful (and I know there will be plenty of cases in our super-bright Colorado sun where only three won’t do the trick).

It’s also been extremely frustrating just finding square, solid, ND filters. There is an abundance of graduated ND filters, but solid ones seem to be few and far between. My best guess as to the reason for this frustrating fact would be that still photographers are the vast majority of Cokin P users, and graduated ND filters are used all the time for skies.  Cokin filter holders just haven’t caught on yet for videographers needing solid ND filters for achieving greater depth of field in video.

Finally, something I didn’t think about with the Cokin P system is that you can’t put your lens cap on! The adapter ring that holds the filter holder in place is not threaded on the inside, so your lens cap won’t stick (you can try to put it on, but it will immediately pop right out). They make square plastic “caps” that slide into the Cokin holder, but that’s only good for the lens to which you leave the holder attached (not the other lenses that have the adapter ring in place, but no filter holder attached). There is also a round cap that clips to the adapter rings, but it is rather loose, and tends to fall off if you bump it (no good for a lens cap). Thus, you are stuck unscrewing the adapter rings to place your lens cap back on the lens after each use, which kind of defeats the whole purpose of using the Cokin filter holder in the first place (not having to screw ND filters on and off for each lens).  There is obviously an EXTREMELY easy fix for this solution: Cokin adapter rings that are threaded inside (so you can use your existing lens cap), but nobody seems to be addressing this situation by manufacturing this product (hopefully somebody in China will read this and start making interior-threaded Cokin adapter rings!).

So here I am, sort of back to ground zero.  Perhaps I’ll pony up and buy some nice Lee or Singh-Ray ND filters and keep using the Cokin system and just deal with the fact that I’ll need to remove the adapter ring for each lens after each use (so I can put the lens cap back on).  Or perhaps I’ll make the switch back to circular, screw-on filters after this experiment --mostly because the circular, screw-on filters are less expensive and easier to find.  I’ll have to get step-up rings for all my lenses and deal with the PITA of having to screw filters on and off with every use… but I’ll be doing that anyway with the Cokin system (since I’ve realized I’d be screwing the adapter ring on and off for each use to be able to use a lens cap).

The goal of this whole experiment was to find a way to not have to screw filters on and off of my lenses for each use.  If I move back to circular, screw on filters, I will be screwing TWO things on for each use (a step up ring and the filter).  The alternative would be to leave the step on ring on all my lenses, but then I would have to purchase new (bigger) lens caps for all my lenses.  Thus, even having to screw on an adapter ring for the Cokin system with each use, I’m screwing on only one object (the adapter), vs. two (the step-up ring and filter) with the circular, screw-on method.

Thus, it’s kind of a crap-shoot as to which system wins.

Here is an in-depth post on ND filters, albeit for still shooting, that I stumbled upon after I made this post.  There’s not a lot on Lee and Cokin filter holders, but there’s a lot of info on ND filtering.

Monday, March 5, 2012

Taking the DSLR for Video Plunge (Part 3: Choosing the Right Accessories)

Taking the DSLR for Video Plunge
Part I: General Questions and Choosing the Camera
Part II: Choosing the Right Lenses for Canon DSLR Video
Part III: Choosing the Right Accessories

[I’m going to go ahead and publish this un-polished post, because it’s a work in progress and has a lot of valuable links that I want to get online; check back often, as this post will definitely be evolving. Please also feel free to make suggestions for additions in the comments!]

The MASTER LIST of what I think I need to get started:

  • Rail Kit - some people will opt against this, but I’d like to utilize the stability of rails for my accessories)
  • Follow Focus - the main reason for using rails, and yes, there are some good follow focuses that don’t need rails, but…
  • External Monitor/LCD magnifier - most people recommend just starting with an LCD hood and magnifier (you need this for shooting in bright sunlight, and magnifying the LCD allows for sharper focusing
  • Neutral Density (ND) filters – if you plan on shooting outside and want shallow depth of field, these are indispensible
  • Universal Quick Release Plate – for moving your camera(s) from rig to rig
  • Solid Tripod and Video Head
  • Dolly (already made)
  • Extra Batteries
  • Battery Charger (with car adapter)
  • Battery Grip – probably not a necessity, but since I found one with great reviews for $80 (vs. $300 for the Canon one) I decided to give it a shot

Right now I’m opting to not get a shoulder mount (I’ll be using mostly sticks, a high hat, a crane, and a dolly).  For handheld I’ll build a fig rig (see below).


FOLLOW FOCUS

Several fellow filmmakers have suggested I won’t need a follow focus, but after even just a few weeks of mucking about, I know I really want one.  I tend to rack focus a lot, and I also do a lot of wide pans that utilize shifting the focus, and trying to focus by grabbing the ring on a short Nikon prime without bumping the camera or jostling your shot is extremely difficult.

Phillip Bloom: best entry level follow focus (D-Focus V2)


RAILS/CAGE/RIG

Building your own rail system: http://blog.planet5d.com/l9x

9” cage with top handle and tripod mount:
http://www.thecinecity.com/eshop/product.php?productid=487&cat=299&page=1

http://www.indisystem.com/products/Bulldog.html

http://www.edelkrone.com/the-pocket-rig/

Redrock Micro Bundle Review on Creative Cow

90 degree clamp review: http://justbaslproductions.com/Just_Basl_Productions/90_Degree_Clamps.html

Bendable Fig Rig (this is the Fig Rig I went with –mistake, more on that later): http://www.dvxuser.com/V6/showthread.php?73078-My-DIY-rig-is-a-Figrig-plus!-%28Pics%29

DIY Rig handles:

http://filmmakeriq.com/2011/08/diy-dslr-rig-handles/

The Next Rig I’m trying:

http://filmmakeriq.com/2010/09/50-diy-dslr-cage/

Do it yourself shoulder rig:

http://www.diyphotography.net/convert-an-ikea-cutting-board-to-a-camera-video-rig

http://filmmakeriq.com/2011/05/diy-dslr-pvc-shoulder-rig-tutorial/


BATTERIES and related accessories

From my own experience, third party batteries are shite.  They don’t charge properly, they don’t hold a charge properly, they drain fast when not in use, etc., etc., etc.  The battery for my old Canon 40D was somewhat of a miracle.  I could shoot for WEEKS without charging that thing.  Thus, I have great faith in Canon OEM batteries.  They cost about twice as much as after market products, but in my experience, it’s worth it.  And you don’t want to get left in the field with no juice.

I am purchasing a dual charger as well.  B&H sells the Pearstone Duo, which received rave review, for $80, but I found what appears to be the exact same thing on Amazon for only $55 delivered.  It doesn’t have the name printed on the front, but everything else appears to be exactly the same.  I love that this charger has a digital read out, charges each battery independently, and even has a USB out to charge your phone!

UNIVERSAL QUICK RELEASE PLATE

Tripod Quick Release plate cross reference chart (this was great when I was trying to figure out how to make all my tripods/heads work together, and what universal adapter I was going to go with and invest in): http://www.tripodquickrelease.com/Bogen_Quick_Releases.htm

MATTEBOX

One thing that’s not on my master list above is a mattebox.  I keep going back and forth on this one.  When shooting outside, a sun-shade mattebox is pretty much indispensible (to keep direct sunlight from shining into your lens and creating flare and haziness), but you can always just use a card or bounce (though it would be awkward to hold the camera and the card, so an assistant is preferred) if you don’t have a dedicated sunshade mattebox.  But what I’m more interested in is a mattebox for utilizing filters (specifically ND filters).

The biggest thing preventing me from getting a mattebox is the price.  A decent one is around $500, and the RedRock Micro and Zacuto Petroff are $1,000 and $1,300 respectively.  More than a thousand dollars for what is basically a universal filter holder with barn doors?  I think the “pro-look” of a mattebox has grossly distorted the going market price for this item.

This brings me to:  universal filter holders.  I’m not sure why this isn’t discussed more among DSLR video shooters.  Purchasing ND filters for all your different lens sizes is cost prohibitive.  You can use step-up/down rings so you only need one set of ND filters, but if you go this route, it’s a serious PITA to switch out the filters (screwing them on and off) when you need to make adjustments.  Enter the universal filter holder.

When shooting stills I used to use the Cokin filter system.  Basically, there is a square holder that attaches to the front of your lens and can hold up to three filters.  I recommend the “P” system which uses 84mm filters and can accommodate lenses up to 82mm in diameter.  They make two bigger sizes, but they become cumbersome, and aren’t really necessary, supposedly the “P” system works great, even with wide lenses (I’ll be using this system with the Tokina 11-16mm).

I actually don’t recommend Cokin filters (they’re made of resin, not glass, and I’ve seen distortion and color problems, especially when stacking multiples), but I DO really like the universal holder idea.  Furthermore, there are other manufacturers (like Lee and Tiffen) making square filters for the Cokin P (84mm) system out of high quality optical glass (as noted below, even Hitech and Fotodiox are making square glass filters, though I assume much lesser quality).  Not only that, but there are plenty of knock-offs on eBay, which means you can get what is essentially a Cokin P universal holder, the 77mm ring that holds the holder, and even a square hood for $12 shipped on eBay ($16 on Amazon).  I can then get the appropriately sized Filter Holder rings for all my lenses and simply pop the holder onto whatever lens I’m using, thus making it possible to use one set of ND filters on all my lenses.

It’s probably worth noting that Fotodiox is making glass 84mm ND2 filters for the Cokin P system for only $6 a piece.  I assume they are crap, but for $6… might be worth it to someone on a super-tight budget… at least to get you by until you can purchase a $250 Lee ND filter. (Disappointed smile yowch!)

So once I have my universal filter holder and appropriately sized rings for all my lenses, all I need is a cheaper mattebox that I can use for the flags and barn doors (for lens flare).  I will be sure to get one that can “swing away” (instead of actually fastening to the front of the lens) so it’s easier to use with multiple length lenses.

UPDATE: (actually, this section on universal filter holders got too unruly for just a section of this post, and I created a new post for the topic)

Taking the DSLR for Video Plunge
Part I: General Questions and Choosing the Camera
Part II: Choosing the Right Lenses for Canon DSLR Video
Part III: Choosing the Right Accessories

Wednesday, February 15, 2012

Building a Skate Wheel Dolly for Film and Video

Last week I pulled the Kessler Crane that a friend gave me after a shoot out from the garage.  It got me excited to start shooting again, but I am currently without a dolly, as I sent the one I’d previously been using back to its original owner after the last project.

So time to build a dolly.

There are lots of different styles and methods on the web, but a lot of the how to’s are videos, which I always find incredibly frustrating (I don’t want to have to watch a video).  A lot of the how to’s also don’t have a parts list.  A lot of the how to’s also add a lot of unnecessary steps and parts.

So I thought I’d document my version here.


Parts list for the Dolly:

Thrift Store:

  • 16 - in-line skate wheels (that’s two pairs of Rollerblades… I paid $2.50 a pair for a total of $5 at the local Habitat for Humanity ReStore)
  • If you don’t want to use used wheels, you can also order new wheels on E-bay.  There are consistent offerings of wheels for around $10 for four wheels.  You can probably find even better deals (as I type this there is a lot of 44 brand-new 84mm wheels with abec-5 bearings going for $9.99).

Lowe’s or Home Depot:

  • 16 - 1/4” x 2” zinc plated hex bolts (I paid $.24 each)
  • 64 - 1/4” zinc plated flat washers (I paid $.11 each)
  • 32 - 1/4” zinc plated cut washers (I paid $.15 each)
  • 32 - 1/4” zinc plated hex nuts (I paid $.09 each)
  • 02 - 1-1/2 in. x 48 in. zinc plated slotted angle rail (I paid $.11 each)
  • 01 - 48” x 28” 3/4” plywood platform
  • 02 - 48” 2x4’s (these aren’t absolutely necessary)
  • drywall or wood screws

NOTE: At Home Depot, the hardware packs of 100 pieces cost considerably more than buying pieces individually; stupid but true.


Parts List for the Track (modify liberally with whatever you might have available):

Lowe’s or Home Depot:

  • 02 – 8’ lengths of Galvanized or aluminum 1 5/8” diameter fence post (used for chain link fence)
  • 01 - 60” 2x4
  • 08 - 2 5/8” 16 penny nails


You will be fastening the skate wheels to a piece of angle steel as shown here.  There will be four clusters of four wheels, that will glide on two steel pipes (galvanized chain link fence posts) for track.

IMG_8209


Here is one of the Rollerblades I stole the wheels from. You simply unscrew the bolts with an hex (Allen) wrench and remove each wheel.

IMG_8184


Here is the hardware (bolt, wheel, nuts, and washers) laid out in the order you will assemble them. It goes: bolt, flat washer, cut washer, wheel, cut washer, flat washer, nut, flat washer, rail (not shown), flat washer, nut.  The cut washers fit up against the wheel bearings and allow the wheel to spin.  This is critical.  If you don’t use the cut washers, the flat washers will press against the wheel and the bearing and the wheel won’t be able to turn.  If you want, you can use a stand-off (a metal tube) instead of a cut washer, but the cut washer is the cheapest route and works great.

IMG_7938


The perils of using used skate wheels. As you can see in the photo, the previous owner failed to rotate her wheels on a regular basis, thus the wheel is lopsided. To avoid this problem, you can either buy wheels new, or simply install the wheel with the worn side out (so the unworn side hits the track). The wheel in the photo below will thus need to be flipped on the bolt axel.

The perils of used skate wheels


Here are all sixteen wheels, assembled and ready to attach to the rails.

16 wheels all in a row


Here is a detail of how the wheels are attached to the rail.

How they're attached (detail)


You can space your wheels however you see fit.  I’m a little OCD, so I set mine on the holes lined up with the imprinted diamond mark on the rail.  Just make sure if you are using a slot that allows the bolt to move up and down or back and forth, that you’re setting everything in the same position.

IMG_8203


Next comes the dolly platform.  You will be tempted to make the platform as wide as possible to accommodate wide-spread tripods, but I highly recommend making your platform less than 30” wide, so it will fit through most doors.  Some doors are only 28” wide, but most are either 30”, 32”, or 36”.

The thicker the wood for your platform, the sturdier the dolly will be, but this also means it will be heavier and harder to lug around.  I had some 1/2” plywood lying around, so that’s what I used.  It’s got some flex to it, so I ran 2x4’s all the way around the edge (the two steel rails (to which the wheels are bolted) running the length of the platform pretty much take care of the longitudinal flex, so the cross pieces are all that’s really necessary.  However, I did the whole perimeter so there would be something to grab when carrying it around (the 2x4’s act as a handle).  If you want, you could also glue a top layer of thinner MDF directly to the plywood to make it really strong and prevent flex, but this will contribute greatly to the total weight.

IMG_0602


You will almost certainly find that you need to raise the wheels a bit off the platform (they will likely rub against the underside of the dolly).  You can use longer bolts and extra nuts to address this, but I feel that longer bolts run the risk of bending or at least flexing.  I chose to put a small strip of wood under each steel rail.  You will want to do this before/while setting the width of the rails (next step).

IMG_0046


Finally you need to make the track on which the dolly will ride.  The standard width for dolly track is 24.5 inches (62.23cm), so it makes sense to set your track at this width.  Flip the entire set up over and set your wheel rails on the bottom of your dolly platform.  Place your track on the wheels.  Again, you should now have your dolly and track laid out on the floor upside down.  Measure 24.5” on center from pipe to pipe, and then screw your wheel rails down to the dolly platform.  You can also just measure the peak of the steel rails if your wheels are evenly spaced on either side of said rails.

IMG_0050

IMG_0054

IMG_0599


Ideally you would also have crossties (supports every 2 feet or so) to keep the dolly track from flexing. An easy solution for crossties is sandbags. You can permanently affix your crossties to the track by drilling a hole in the center of the pipe and screwing it down to the cross ties, but it makes it more difficult to transport the track.  I have also found that even when riding my dolly there is little to no flex in 1 5/8” galvanized steel pipes, so I don’t use cross ties.

You can join lengths of track together for a longer track run, but you will almost certainly get a “bump” in your footage when you roll over the seem where two pieces of track meet. If you do join pieces, you will want a tight fitting tube or solid cylinder fit inside the two pieces of track to keep the two pieces fit snugly together.

Some people would suggest it’s just as easy (though definitely not as cheap) to buy track, and build your dolly.  When you purchase track, you’ll also have better luck with joining lengths together (if you need a run longer than 8ft.).  You can also buy curved sections (bending pipe requires special tools, and is beyond the scope of most DIY-ers).

At this point, you may also want to make a “hi-hat.”  This can be simply a piece of plywood with a bolt in the middle of it (on which to mount your camera).  A hi-hat is just a sturdy way to set your camera on a flat surface (like a dolly).  Obviously you’ll want to recess the hole for the bolt on the bottom of the hi-hat, so the board rests flush on a flat surface.  I drilled a hole then glued the bolt in place with Gorilla Glue.

p.s. Don’t store your dolly on the rails or leave it sitting for a long time or you’ll create flat spots on the wheels that will cause bumps when you roll.