Showing posts with label software. Show all posts

Wednesday, June 1, 2016

Exact Audio Copy (EAC) Won’t Convert to Flac

EACIf you are having trouble getting EAC to convert to Flac on rip, it may be that you are trying to rip to a NAS (network) directory.  It seems EAC doesn’t like using a NAS directory when converting files.  I assume it has something to do with no “solid” drive path to the file that needs to be converted after it has been ripped to Wav.

Everytime I hit “shift-F5” or clicked the CMP (copy selected tracks compressed) button, EAC would only rip the tracks as Waves (not convert them to Flac once they’d been ripped).

I having a feeling a command line change could solve the issue (some sort of change to the %source% and/or %dest% settings), but my quick fix for now is to map the music directory on my NAS to a Mapped Network Drive.  Once I did that and pointed EAC to the mapped drive instead of using the network path, everything worked fine.

Monday, April 25, 2016

The Easiest Way to Convert MKV to MP4 (MOV)

I recently wanted to do a little content editing of an MKV file.  I really didn’t want to spend time converting the file (and losing video and audio resolution), but every “trick” I could find online involved downloading software for demuxing, converting, etc. (things that take time, and mostly things that alter the original video –not to mention things that often come from shady sources).

So I thought about it for a bit, poked around in some of the (free) software I had readily available, and found a solution.

An MKV file is just a container.  Thus, I figured I could just change the extension (.mkv) to something else more “useable” (like .mp4) and mess with it that way.  Just changing the extension made Adobe Premiere unhappy (header issues), but as usual, VLC handled it just fine.  Not only that, but VLC ultimately turned out to be the solution for what I needed to do.

In VLC, you can save a file (right click the file in your playlist and select “save” from the list), and under the “settings” options you have “convert” and “dump raw input.”  First I tried utilizing the RAW option, but when it went to “streaming” after clicking “start,” there didn’t seem to be any progress, so I tried the next option.

Using the “convert” option, you can select pretty much any preset to do what we want to do, but I wanted an MP4 so I chose the first thing on the list:  Video – H.264 + MP3 (MP4).  Of course I don’t want MP3 for my audio (I want to keep the original file format), but don’t worry!  The next step is to click the tools/settings button next to the profile drop down. There you will see tabs for “video codec” and “audio codec.”  In each of those settings, you can choose “keep original video track” and “keep original audio track.” Once you do that, you simply click “start” and you’ll see your progress bar tick away.  It took me about four minutes to ouput a 2 hour movie that was originally 17.8 GB as an MKV.  However, the new file was now 11.4 GB, so obviously something had changed (and I assume resolution was lost, thought the file still looked pretty similar to the original).

I actually created a profile called MKV to MP4 wherein I selected the “original video” and “original audio” options with an MP4/MOV container, and the subsequent “conversion” took only around 20 seconds.  I had opened and closed VLC several times, but I suppose the conversion could have still been using cached files.

UPDATE: If the original audio format (like the audio in the file i was using) isn’t an audio format that VLC has in its output codec selection, trying to utilize the “original audio” option will create a file with no audio.  I’m not sure why it does this, but to correct for the problem, I changed my profile to convert the audio, and set up the audio as a high bitrate AAC with a sample rate the same as the original (48KHz).  The resulting file was a bit larger than the previous and took longer to output (because it’s actually converting the audio), but now has audio and can be imported into Adobe Premiere.

It turns out that the RAW dump is actually the better option if you’re trying to keep the file exactly like the original (just changing the extension), it just wasn’t showing me a live process when it was outputing a file.  I tried the RAW option again, and sure enough, after about four minutes (the same amount of time the above “convert” option took), I found I had an MP4 exactly the same size as the original MKV.  Unfortunately the file still wouldn’t work with Premiere, althought now i just get a “generic error” when trying to import the MP4 into Premiere.

Monday, January 4, 2016

I Hate Plex So Much

I have been hobbling along with Plex for nearly two years now.

thumb-logo

I have re-named all my files by their facist naming system (since Plex ignores the title information and anything else from file details) and placed each and every file in directories exactly as Plex has instructed.

As an early adopter, I paid hard-earned money for their Roku app (which should provide an elevated level of functionality… it does not).

I have spent hours looking through forums and trying to find information on their official website.

Still my files are constantly renamed (almost always incorrectly) and almost NO FILE has a thumbnail that corresponds to the actual film or television program it represents.  Even when I manually add names and poster files via the computer desktop interface, Plex will inevetiably switch the name back to whatever it wants, even when I use Plex’s “lock” funtion (this is particularly frustrating with episodic television).  Not only does Plex rename the titles, but it also removes the artwork I have assigned to replace the thumbnail with an image of Kevin Spacey from House of Cards.  I love Kevin Spacey, but I am so sick of seeing his #*&$% face on EVERY THUMBNAIL IN MY LIBRARY.

Furthermore, when I search (FF/RW) the “preview” always shows scenes from The Long Goodbye.  No matter the show I am watching, FF/RW will only show Elliot Gould, never the characters from the program I am searching through.  Thus, I have to guess how far forward or back I have gone.

I have dumped caches, refreshed databases, optimized databases, on and on and on… all to no avail.

The Plex interface in Roku is abysmal, especially since all the thumbnails are wrong.  I can’t search visually (since every thumbnail is the same still from House of Cards), so I have to highlight each and every file to see what the program actually is.  Not only that, but whoever created the Plex navigation for the Roku interface should be dragged into the street and beaten.  It is the most convoluted and unuseable maze of nonsense I have ever encountered.  I have no idea what they were thinking when they were creating the “quick access” sections, as each offering is completely useless when I’m trying to find the content I want to watch.

I am at witt’s end. I absolutely HATE Plex, but there seems to be NO OTHER choice for viewing my NAS stored media via Roku (which is what all the tv’s in our house use to access streaming media).

I could switch to XBMC and mirror to Roku, but I don’t want to have to access media via a computer (I want to use just Roku and NAS).

Why in the world is Plex the only game in town?!

Goodbye Windows Live Writer, Hello Open Live Writer

I use Windows Live Writer to compose my posts (it’s a much more robust desktop blog composition interface than anything else I’ve been able to find).  A couple of days ago I tried to post here, and I got a log in error from Google (The Invisible Blog is hosted on Blogger).  This has happened (a lot) in the past (basically everytime Google changes any log in protocol), and I didn’t really have time to troubleshoot at that moment, so I revisited the issue today.  Turns out the problem is going to be permanenet.

Microsoft hasn’t really updated Live Writer since August of 2012.  Since Google updated their API at the end of 2015, Windows Live Writer will never work with Blogger again.  Luckily, Microsoft turned Live Writer over to .NET Foundation (which includes a bunch of Microsoft employees working as volunteers) and they are working with Google/Blogger to make Blogger and Live Writer play nice.

openlivewriter-purpleheader

There are some things that they’ve done away with (spellcheck –won’t work on Win7 but will hopefully work on Win8 using the OS’s built-in spell check, albums –which I’ll miss because it was an easy way to upload a group of photos), and there are some things that just aren’t supported yet (categories –hopefully they are able to get this back up and runnning, plug-ins –I don’t use any, so this doesn’t really affect me).

A current annoyance (but minor, in comparison to the possibilty of not being able to use Live Writer at all) is that Open Live Writer doesn’t seem to be able to open any Drafts that are online (it only has the option to open local drafts).

I am happy to know that there are people keeping Live Writer alive, especially since no one seems to be interested in creating decent blog composition software (which seems REALLY weird, since the internet has become basically one giant blog).

Kudos, people of .NET Foundation.

Autopopulate Fields With KeePass

keepass_512x512I have been happily using KeePass to safegaurd my passwords for years.

My one gripe has always been that to use my username and pass, I have to open the database, find the entry I want to use, then either right-click “perform auto type” or copy and paste the username and password.

Today I found out I’ve been doing it wrong. :-\

There is actually a keyboard shortcut/hotkey that will allow you to simply click on the username field and then KeePass will recognize the site’s address and autopopulate the necessary fields.

Once you’ve clicked inside the username field, simply click ctrl-alt-a.

It doesn’t always work, but it’s worked every time I’ve tried it so far.  This is a MAJOR time saver (you don’t have to open KeePass, find the entry, and populate the fields).

You can also alter the hotkey combo by going to Tools>Options>Advanced, and then in the lower right corner there is a button marked “Auto-Type” where you can change various settings for this hotkey combo.

image

Format Large SD Card for Android

I’ve got several older devices laying around that I use for various things (media players, cameras, etc.).  Recently I tried to upgrade the Micro SD card in my HTC Droid Incredible (ADR6300) running Android 2.3.4 from 8GB to 128GB and I had a heck of a time getting it to recognize the 128GB card.

Formatting via Windows for anything over 32GB can’t be done using Disk Tools (you can only format as exFat and NTFS).  Thus, if you’re going to format with what you’ve got in Windows, you have to use a command line.  Using the “quick” format command in the command line ( format <drive letter>: /FS:FAT32 /Q) almost always causes failure for disks over 32GB, and when you don’t do a quick format, it almost always pretends like it’s formatting for a couple of hours, then fails.

I actually got the Droid to recognize and format the card using its own utility at one point, but then the phone just went into boot loop and finally hung on the HTC screen.

I am loathe to download and install programs from weird locations around the web, but after about an hour and a half of trying all the routes that DIDN’T involve installing software, I finally broke down and installed FAT32Format from Ridgecrop Consultants, LTD (a guy in the UK).

Here is their fancy logo.

While their graphic design may leave something to be desired, their code rocks.

Lemme tell you… I wasted a lot of time trying to figure out “other ways” when I could have just done this in the first place.  The executable is tiny (76KB), and the disk was formatted and working in my droid in less than 60 seconds.

Kudos, Ridgeway.

Wednesday, June 10, 2015

Red Giant MisFire Setting Definitions

The problem with MisFire is that I have NO IDEA what the different settings of each thing do.  I end up having to look stuff up every time, and when I do, I usually end up at this page, so I’m reposting here (basically so it’s easier for me to find!).

Major props to whomever posted this information online at:

http://www.aemoban.com/Source_Files/AE-misfire.html

I can’t figure out what the aemoban site is (the top tier is in Chinese), so I’m reposting the information here (because who knows when that page will disappear).  No copyright infringement intended.  Just making the information available to the filmmaking community!

=====================

MisFire Plug-ins

MisFire adds a host of tools to your effects arsenal to simulate film damage. The main MisFire plug-in is a single complete tool that offers 13 different effects. Each category of effect can be turned off individually using the category switch. The effects are: Fading, Funk, Splotches, Dust, Flicker, Vignette, Displacement, Grain; and 3 different types of scratches, Microscratches, Basic Scratches and Deep Scratches.

The main MisFire plug-in is accompanied by individual plug-ins for each effect category. For example, if you only want to apply grain and basic scratches, you can apply these as individual effects called Misfire Grain and Misfire Basic Scratches.

MisFire plug-ins are not a perfect duplication of every type of film defect. Film defects are wide ranging in their appearance and include problems caused by dust, dirt, film wear, duplication problems, splicing, irregular exposure or improper storage of the film medium. These defects can show up in the frame or be caused by improper projection. MisFire attempts to artistically emulate a number of these defects.

clip_image001


MisFire Fading

Fading causes an overall lightening of your image that is exhibited as lower contrast.

Fade Amount: The default value is 100, lower values will lessen the effect.

clip_image002

clip_image003


MisFire Funk

Funk provides for tone variation across the frame. This simulates a film negative with lightness variation across the entire frame that may be caused by improper storage or in an environment where fungus or mildew could form. This is similar to the splotches but occurs throughout the frame and will persist from frame to frame.

Funk Opacity: The default is 15%. High values may look unnatural but feel free to adjust to taste.

clip_image004

clip_image005


MisFire Splotches

Splotches manifest as a local dirtiness or discoloration of the frame. This can happen on any frame and will usually only persist for a frame or two at a time.

Number: Controls the number of splotches on any given frame where the scale controls the size. The Scale value at 1.0 will cover about 40% of a standard DV-size frame or about 16% of a 2K film frame.

Transparency: Controls the darkness of the discolored areas. You may need to lower the value on very bright footage (to make the splotch less prominent) or raise the value for very dark footage to bring out the effect.

Frequency: Determines how often a splotch will appear in a sequence. The default value of 50 will cause a splotch to appear on half of the frames. Try lowering this value if you want the splotches to occur less frequently.

clip_image006

clip_image007


MisFire Dust

Dust essentially draws bits of black and white material onto the frame. This is effect is similar to the small particles that appear on film that has been run through a projector numerous times. The defaults are meant to generate a small amount of both black and white dust that is very noticeable.

NOTE: While a number of categories include a Frequency control, each category determines its frequency separately, so splotches won’t necessarily appear at the same frame as dust or any other category of effect.

Black Dust Amount, White Dust Amount: Control the maximum number of black or white dust particles appearing in any one frame. For large frame sizes, you may want to make this value much larger to increase the appearance of the dust.

Opacity: Specifies the transparency of the dust particles. The default is 100%, which makes the particles quite noticeable. If you want the dust to look smaller in the frame, try lowering this value to between 40 and 60%.

Frequency: Determines how often a dust particle will appear in a sequence. The default value of 50 will cause dust particles to appear on half of the frames. Try lowering this value if you want the dust to occur less frequently.


clip_image008

clip_image009


MisFire Flicker

Flicker causes the image brightness to change from frame to frame. This is similar to the uneven brightness caused by the degradation of an old print.

Frequency: Operates the same as in the Dust or Splotches categories, where the value specifies the percentage of frames in a sequence that will have change. The default value of 50 means that half of the frames in a sequence will change in brightness.

Flicker Amount: Controls the degree of brightness change. The default of 10 will cause only a small variation.

clip_image010

clip_image011


MisFire Vignette

Old film tends to exhibit a lot of darkening around the edge of the frames, which is often a result of the lens and camera that were used to shoot the film. Vignette will mimic this aberration. Unlike other MisFire effects, Vignette does not animate or change from frame to frame.

NOTE: Magic Bullet Looks includes an integrated Vignette tool that you can use as a replacement for MisFire Vignette. The two produce similar results but Looks' Vignette can be integrated into a Look rather than applied separately.

Size: Controls the overall width of the darkening where a value of 0 will darken all the way to the center and value of 100 will not darken the frame at all.

Intensity: Simply changes the amount of darkening.

clip_image012

clip_image013


MisFire Displacement

Often old or mishandled film prints can exhibit a warping of the image caused by a physical bend in the film frame itself. Displacement offers a very simple control for warping the image.

Amount: Specifies the level of warping in the image. With this control, a little goes a long way. This category of effect does not auto-animate so you may want to keyframe the Amount value.

clip_image014

clip_image015


MisFire MicroScratches

MisFire offers 3 different styles of scratches. MicroScratches are very thin, faint black lines across the entire image. Film is often scraped as it run through a projector, creating faint black lines on the frame, and this damage is what is replicated.

Number: Does not correspond to the number of scratches, but instead is a measure of the density of the scratches—higher numbers yield a denser field of black lines.

Opacity: Changes the transparency of the lines. The Number and Opacity controls should be adjusted in tandem. If you raise the Number control, you may want to lower the Opacity, or vice versa.

clip_image016

clip_image017


MisFire Basic Scratches

Basic Scratches generates thin bright or dark lines that wiggle or move from frame to frame. Unlike the MicroScratches or Deep Scratches effect, Basic Scratches will not cover the entire frame but will gently fade toward the top or bottom of the frame.

Number of Scratches: The specified number of scratches that will be drawn on the image.

Maximum Duration: Controls the maximum length that any one scratch will appear on the image. The duration is determined randomly for each scratch and can be between 1 frame and the maximum specified number of frames.

Invert: Lets you specify either dark lines (when it is on) or light lines when it is off.

clip_image018

clip_image019


MisFire Deep Scratches

Deep Scratches generates a colored scratch that appears to have depth, and to wiggle or move from frame to frame. This colored scratch mimics a physical scratch on the film that has removed some of the film resist, letting light through that is pure in color. The scratches can shift left or right by a random amount that varies from 0 to 5-7 pixels, depending on the size of your image.

Number of Scratches: The specified number of scratches that will be drawn on the image.

Maximum Duration: Controls the maximum length that any one scratch will appear on the image. The duration is determined randomly for each scratch and can be between 1 frame and the maximum specified number of frames.

Tint Color: Specifies the color of the scratches. The default color is close to pure green, which is the color of real scratched film.

clip_image020

clip_image021


MisFire Grain

When most people think of film, they think of grain. While some film stocks do exhibit noticeable grain, this type of effect is best used sparingly. The Grain category generates more than just random noise. If all you want is random noise, a simply noise filter applied on top would work fine. The Grain controls go beyond this by letting you create the multi-colored clumps associated with true film grain. Grain offers ten different controls for specifying the amount of grain and where it appears on your image.

NOTE: Magic Bullet Looks includes an integrated Film Grain tool that you can use as a replacement for MisFire Grain. The two produce similar results but Looks' Film Grain can be integrated into a Look rather than applied separately and its speed is generally 3-4 times faster.

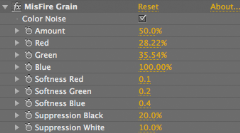
Color Noise: Lets you simply specify whether the grain is the same on all the color channels Red, Green and Blue. This control is on by default. If you turn it off, you will notice that the colored grain disappears and is replaced by a tinted noise, based on the Red, Green and Blue percentages.

Amount: Gives you control over the density.

Red, Green, Blue: These three controls specify how much grain appears and how soft it is. The Red, Green, and Blue controls are specified as a percentage and these bias the Amount setting. For example, the Red control defaults to 28.22%. This means that only 28.22% of the Amount value is used in the Red channel of your image. If these values are all the same, then the grain will have the same amount applied to each channel. They are interrelated and related to the Softness controls.

Softness Red, Softness Green, Softness Blue: These three controls let you soften the grain on each color channel. Smaller values mean harder edges, larger values add a more diffuse look. It is best to stick with small values in these controls. They are interrelated and related to the Color controls.

Suppression Black, Suppression White: These two controls determine whether the grain is drawn in purely white or black areas . The percentages specify the percentage of brightness or darkness in the frame where the grain will NOT appear. For example, 10% Suppression White means that the grain will not draw in the very brightest pixels in the image and will only appear fully in areas that are 10% or less of fully white pixels.
clip_image022

clip_image023


MisFire Gate Weave

When a film frame passes through a projector, sprockets outside the image area control the vertical motion of the frames through the projector. Over time, a film can be become warped or the sprockets can wear, causing the frame to appear to move side to side. This kind of motion is called Gate Weave and this effect mimics it.

Weave Frequency: Controls the speed of the left-right motion of the frame. Small values cause the frame to move slowly. High values will cause the frame to move quickly from side to side.

Amplitude: Measured in pixels. The default of 5 pixels will cause the frame to move left or right 5 pixels then return to center.

Noise Frequency: Varies the motion by the percentage you choose. Small values will cause a slight variation of the motion, while large values will cause the frame to appear to jitter.

clip_image024

clip_image025


MisFire Post Contrast

Film often appears with higher contrast than video. Over time the darkening or contrast change can be quite pronounced. The Post Contrast control lets you quickly add this effect.

Contrast: Applies a darkened high contrast effect. The default value is fine in most cases. Values beyond 50 will likely look unrealistic. Negative values can cause the image to appear to wash out.

clip_image026

clip_image027


Wednesday, April 29, 2015

Clearing the Android Clipboard on Samsung GS5 Running Lollipop

clear clipboard

Clear clipboard… get it? HA!

Since I started using crazy long, unmemorable passwords for just about everything, I started using KeePass on my Galaxy S5.  The problem is, when you copy a password to the clipboard to fill in a password field, Android holds that password in the clipboard. Even worse, the clipboard actually holds multiple items!  This means simply hitting “paste” will populate any field with the password you are trying to keep secret.  It also means those copied passwords (multiple passwords) are being stored on your Android clipboard.

http://keepass.info/images/icons/keepass_256x256.pngKeePass has a setting that allows you to set the time that Android should keep the password on the clipboard (settings: “Clipboard Timeout” with options 30 seconds, 1 minute, 5 minutes, and never), but the setting doesn’t seem to do anything (it simply doesn’t work).  My GS5 running Lollipop will keep a password on the clipboard indefinitely, even though I have “1 minute” selected in the KeePass settings (and have tried all the other options as well).

Supposedly Lollipop has implemented new API functionality that allows programs to copy/paste a password without using the clipboard.  I learned this from a post about 1Password which stated:

In Lollipop, 1Password can fill your information directly, without using the clipboard. Therefore, it isn’t possible for a third party to obtain your passwords by snooping on what 1Password’s doing.

The problem is, KeePass doesn’t seem to have implemented this “cool feature” yet, and my password is left hanging on the clipboard (to be accessed by malware, a user, or a clipboard manager).

In researching this issue, most posts on the topic say that you can simply long press in a text field to access the options “paste” and “clipboard” (or something similar), but on my device, this is not the case.  When I long press in a text field, I only get the “paste” option (thus, no option to clear my clipboard).

Other posts state that you can access the clipboard via an icon on your keyboard, however, the Google Keyboard has no such icon or accessibility (there is no button that gets you from the Google Keyboard to the clipboard).

If I switch to the Samsung Keyboard (which I hate), I can long press the second button to the left of the space bar (which can be assigned several different options), and one of the options is an icon of a clipboard.  Pressing this button does in fact gain me access to the clipboard (and quite a long and disturbing list of things stored there, including 10 or so passwords!).  WTF?!

So… I guess the problem is that the Google Keyboard ignores clipboard access functionality.  In order to access (and clear) your clipboard, you need to use a NON-Google keyboard, or a clipboard management app.

Obviously the best solution would be if KeePass just started using the Lollipop API that allowed for “non-clipboard” copied password storage… not to mention actually clearing the copied password after a certain amount of time like it’s supposed to.

Saturday, November 15, 2014

Configuring Gmail for Multiple Accounts and Devices

Part I: Setting up your domain server(s) and Gmail

I’m pretty sure there is no one I know who has only one e-mail account.  This also extends to devices… other than my grandma, if you include your computer, who only has one device?

Thus, coordinating all your e-mail accounts and devices is a pretty serious necessity these days, and unfortunately, it’s not always that easy to set up… at least not so that it runs as smoothly as we’d all like.

pile_of_junk_mail_from_the_netherlandsI actually have around 25 e-mail address (I am an artist, a musician (with multiple entities), a designer, a filmmaker, a business owner, a webmaster, etc., etc.).

I also have 7 devices that I regularly use for communication (four computers, my phone, my tablet, and my bedside device (my old phone)).

Getting everything to work well together has been a crazy evolution over the years, but I’m finally getting to a point where it all works pretty seamlessly.

Back in the day, I accessed e-mail directly from my various severs using POP or IMAP (first using Eudora then Mozilla Thunderbird).  Over time, spam became an insane issue, and the best spam filtering software out there is, no question, Gmail.  They just do it best.  In fact, really the only reason I even have a Gmail account is so that I can filter all my e-mail through their fantastic spam filters.  Of course, this comes at the expense of Google data mining every piece of communiqué I send or receive, but I guess it’s worth the price of admission (very little spam in my inbox, and very little “real” mail in my spam box).

If you have your own server (your own domain and hosting), you can set up e-mail addresses to work with Gmail so that when you send an e-mail from Gmail, it looks like it’s coming from your actual domain (instead of being forwarded through Gmail).  This just looks a little more professional when people examine the headers of your e-mail (like it’s coming from your domain instead of Google).  If you don’t have your own server, you can still send from various e-mails, but they will be treated as “aliases” and will show as being sent from Gmail in the headers.  You will skip the “Cpanel” section below, and go straight to setting up your Gmail “send mail as” settings, and instead of deselecting “treat as an alias,” you will leave the account set to “treat as an alias.”

Setting up an e-mail account as a “non alias,” with a real username/pass and actual SMTP server settings from your domain account, also lets you use the e-mail in other programs like Quickbooks.  For instance, if I have an e-mail called “billing” that I use for invoicing clients, but it’s set up as an “alias” in Gmail, Quickbooks won’t let me use the e-mail address to send invoices because it doesn’t have it’s own password and domain SMTP settings (you can’t use your Gmail log-in to send from an alias in Quickbooks).

[UPDATE 12-3-14] It seems Gmail has changed their policy so that you can no longer send e-mail using their outgoing SMTP (presumably to limit spam and for other security issues).  This mean you now actually HAVE to set outgoing SMTP servers for any address with a non-Gmail domain.

Making it happen:

CPANEL E-MAIL SETTINGS

  • Go to account-level filtering in Cpanel (it’s in the “mail” section of your Cpanel). You can also just use “user level” filtering, but account level filtering will forward ALL domain level e-mail for the rule (both account and user level will work to do the same thing).
  • Click “Create a New Filter”
  • In the “Rules” section”, choose “To” “ANY RECIPIENT” or even better (to be safe and extremely inclusive), “ANY HEADER,” select “contains” and type your email address.  (if you use only “to” then the filter ignores the CC field –this gave me fits for about a month when I wasn’t receiving some of my cc’d e-mail! –weird that some got through and some did not though)
  • In the “Actions” section, choose “Redirect to email” and type the email address to which to forward (in my case, my main Gmail address).
  • Click the “+” to add another action, and select discard message (this will prevent the mailbox on your server from filling up with the e-mail that has been forwarded).
  • Click save, and test it to make sure it works (send an e-mail to this address and make sure it shows up in your Gmail inbox)!

Next, you need to set up your Gmail “Send mail as” settings.

GMAIL “SEND MAIL AS” SETTINGS

From your Gmail inbox:

  • Click the "gear" icon in the upper right corner.
  • Select "settings" from the list (third word from the bottom of the drop down).
  • Select "Accounts and Import" from the blue words at the top of the page.
  • The third section down is "Send mail as:"; click "Add another e-mail address you own."
  • In the pop-up dialog box, enter the name you wish people to see when you send e-mail, and then enter "youraddress@yourdomain.com"
  • Deselect "treat as an alias." (IMPORTANT)
  • Click "next"
  • In the area marked SMTP Server, make sure your outgoing SMTP settings are correct.  Gmail defaults smtp.yourdomain.com but my hosting services requires a change from "smtp" to "mail" so that the field is populated with "mail.yourdomain.com"
  • Enter “address@yourdomain.com” as the username
  • Enter your e-mail password
  • Leave "secured connection using TLS" selected.
  • Click "Add Account."

You will be sent an e-mail that will appear in your Gmail inbox.  Once you have clicked on the link in that e-mail to verify the account, your new address will be functional in Gmail.  Be sure to leave "Reply from the same address the message was sent to" selected in the "Send mail as" section of your Gmail "Accounts and Import" settings.  If you ever want to reply from a different address (than the address to which an e-mail is sent), just select a different address from your "from" drop down in your Gmail compose window (where you are responding to the e-mail).

So that’s the e-mail settings part.  Next comes access the actual e-mail from all of your devices.  This post is getting pretty long, so I’ll address setting up devices in a new post.

Sunday, November 9, 2014

Red Giant Universe Legacy 1.1 “Swish Pan” Transition Blocks Out Video When Used with Text Title

I sometimes like to use the Red Giant Universe “Swish Pan” effect on text intro/outro by dropping the transition onto the beginning or end of a title (text) clip.  Since I am using Adobe Premiere CS6, I must use the “Legacy 1.1” version of Red Giant Universe transitions.

I was finding that anytime I tried to use Swish Pan, any video “behind” the transition effect (below the clip on the timeline), was getting blocked out by the transition.  In other words, when the Swish Pan was happening, I was looking at a black screen with the text doing it’s thing (no video visible –only text).

What I discovered is that the effect defaults to a 100% background opacity, which does not allow the effect to work correctly with a text title (where the background needs to be completely transparent).

The fix is to click the “custom” button at the bottom of the “Effect Controls” panel for Swish Pan.

SwishPan_EffectControls

You will get a pop-up dialog box that contains a field for “Background Opacity.”  You need to change that background opacity to 0.0 and then the transition will perform correctly with your text title.  You may also want to change the “exposure boost” at the bottom of the list from 1.0 to 0 so you don’t get a brightness “pop” when the effect occurs.

SwishPan_CustomDialog

Tuesday, November 4, 2014

My Personal Handbrake Settings

There is a LOT of confusion “out there” concerning the best settings for converting your media files with Handbrake.  There are a lot of opinions, and it’s not that anyone is necessarily wrong, but there are just a lot of different things that will work depending on your needs.

Handbrake_Logo

When I record television or rip the DVD’s I own, I like to convert the files to h.264, as it is a very efficient format for the quality of what you see (file size to picture quality ratio).  It’s also the format that Plex streams natively to Roku for the best (fastest and glitch free) streaming experience.

Since storage has become so cheap, I don’t worry too much about shrinking the size of media, especially if I’m ripping DVD’s (which are already SD instead of HD… which means fewer pixels and less space).  I tend to just keep the file at native resolution (though I always convert to square pixels so devices aren’t confused about how to display the file –the “stretching” or “squishing” you often see when your device is trying to figure out how to interpret a file and display the correct aspect ratio).

My files are usually around 550MB for a half hour tv show at 720p, and a normal DVD movie ends up being around 800MB to a gig (which is decent, considering a “normal” DVD is around 4 or 5GB).

Here are the settings I use when I do this.

PICTURE

One thing I learned recently is that you can actually trim your video file as you are encoding in Handbrake (so you aren’t encoding/keeping any footage that was recorded before/after your program).  If you switch the “chapters” dropdown to “seconds,” you can set the beginning and end points in minutes and seconds.  Just view your file in a media program like VLC to see where you want your in and out points to be, and then when you set them in Handbrake it will encode only the part of the file you want.

I like to keep my files at their original size, but aspect ratios can wreak havoc on media files.  Some programs are in 1:78 (16:9), some are anamorphic with “non square pixels and a 1.33 aspect ratio stretched to 1.78, etc…  I like to make sure everything is just square and physically as it should appear, thus I set “anamorphic” to “none,” and then choose modulus 2.  Then I tick “keep aspect ratio” and choose my width or height.  With HD recordings, I sometimes “down rez” to 720 from 1080 (it’s a smaller file that won’t look much worse (if at all) on an HD screen).  With DVD’s and SD recordings (720x480 pixels (wide) or 640 x 480 pixels (4:3)) I sometimes “up rez” just a tiny bit if the file is actually 640x480 displaying 720x480.  What this means is that a file that is 720x480 but in anamorphic format will actually display as 720x540 in square pixels.  That means more lines of horizontal resolution, for a slightly better picture with not much more space taken up.  Alternatively, a 720x480 file that’s anamorphic but wide screen will display as approximately 848x480 as square pixels.

All you really need to know is that if you’re encoding a non-HD file, tick the “keep aspect ratio” box and then let Handbrake set the width when you set the height to either 480px (native SD resolution) or 540 (if you want to up the horizontal rez a bit –I only do this with anamorphic files so they convert to 720x540).

Finally, make sure your cropping is set to “custom” and all the fields read “0.”  This will keep your file from having black borders.

HandbrakePicture

FILTERS

You can spend a lot of time playing with these.  I just set decomb to default and it does a decent job of removing the horizontal lines created by television interlacing.  Basically the “decomb” filter only applies de-interlacing when there is motion (when the horizontal lines caused by interlacing become visible).  Handbrake does a decent job of “choosing” when to apply this filter, so I just let it do it’s thing.  Using the other filters requires quite a bit more processing (thus time to convert), so I am just satisfied with the speed/quality of letting Handbrake “decomb” as it sees fit.

HandbrakeFilters

VIDEO

I haven’t messed a lot with video settings.  I keep things pretty close to default, but I do know I want a constant framerate (and leave it as the same as source), and I use constant quality instead of variable bitrate.  Variable bitrate takes up less space, but it takes more time to convert and isn’t quite as “good” as constant Quality.  I set the H.264 level to 4.1 and set the speed to around “fast” or “faster” (depending on the show I’m converting and what kind of quality I want from the file).

HandbrakeVideo

Hopefully these settings help somebody set up their Handbrake satisfactorily!

Monday, November 3, 2014

iStabilizer tabMount Review

I recently became familiar with an app called DSLR Controller (see complete app review here).  This magnificent piece of software for Android devices will allow you to control your DSLR with your tablet or phone.  You simply connect your device through the USB port (you will need an On the Go cable and a device that supports “On the Go” connectivity), and your tablet becomes a field monitor with touch screen controls.

But now that I can control my Canon 7D with my LG GPad 8.3, I need a way to attach my tablet to my camera.  Whether I’m shooting video or still photography, there still needs to be a way to securely fasten the tablet to the camera.  When I’m shooting stills, I don’t use a rig because I need freer access to the settings, and I am also constantly switching the camera orientation, thus mounting the tablet via the flash hot shoe seemed the best answer.  When I’m shooting video I have a camera rig, so it’s a simple matter of attaching to one of the billions of 1/4” holes in the cheese plates.

That still meant I had to get a quarter inch threaded hole attached to the tablet.
Of all the ones I found on Amazon, the iStabilizer tabMount seemed the best bet.

20141103_101723

20141103_101742

Unfortunately, the maximum tablet size stated in the listing was incorrect.  The listing said the device could handle ANY tablet UP TO 8.25" wide. I should also point out, looking at the mechanics and dimensions first hand, I think 8.25" is pushing it; I would call 8" the maximum dimension of a tablet it could handle.

20141103_101917

My LG Gpad 8.3 is too long (8.5") to allow the tabMount to hold it horizontally, and the *minimum width* of the tabMount (which is not listed in the Amazon verbiage) is 5.5" (which would actually still be a little loose since that's simply the fully contracted distance from edge to edge and there would be no spring tension to hold the tablet securely).  Since the LG Gpad 8.3 is only 5" wide, the tabMount will not hold it. To reiterate, the tablet is "too big" in one direction, and "too small" in the other.

20141103_102202 20141103_102112

I think the iStabilizer tabMount is probably a pretty good piece of equipment for tablets that actually fit. It seems simple and sturdy. The 1/4"/20 threaded hole is metal mounted in sturdy plastic. The grasping arms are spring loaded so that the tablet is held in place by the contracting tension of a spring inside the backing piece. The spring seems to be strong and the tabs that wrap around the edge of the tablet are large and curved and covered in rubber. I think this holder would do a good job of keeping a tablet in place securely.

20141103_101826 20141103_101851 20141103_101838

I am disappointed that I can’t use the tabMount, as I like the way it works, and I like the build quality.  There is nothing of similar quality, function, and price that I can find for a tablet with the dimensions of the LG Gpad 8.3, so I think I’m going to have build something on my own (see that build/mod here).

20141103_102008(holding the spring loaded arm open; it’s definitely got some grip!)