Showing posts with label how to. Show all posts

Friday, February 1, 2019

Why Won't My Dough Rise?!

My last two batches of bread haven't risen.  Like, at all.

I finally decided to spend a little time figuring out what's going on, and it turns out, it all comes down to temperature (at least it did for me).

There are quite a few reasons why dough might not rise (dead yeast, other ingredients killing or impeding the yeast's ability to work properly, etc.), but temperature is probably the most common issue.

I knew temperature mattered, but what I didn't realize was just how small the window for error is.

I run hot, so I tend to keep my house pretty cool, especially in the winter (when baking is more fun).  I also consider myself way more of a "cook" than a "baker."  As such, I'm used to winging it, shooting from the hip, improvising, experimenting, and being altogether way more reckless than is acceptable with baking, where apparently you have to stick to the rules a little (or a lot) more.

I've got an insanely delicious Oatmeal Bread recipe from my mom/aunt that reminds me of childhood and all things good in this world.  The recipe says you should put a package of yeast in 3/4 cups of lukewarm water with 1/16 teaspoon of sugar and 1/16 teaspoon of ginger.  There are two problems with this.  1. "Lukewarm" can be quite different from one person to another.  2. Ginger is actually an anti-fungal, and yeast belongs to the fungus family!

I wonder if the pinch of ginger is to keep the dough from going crazy.  A kitchen that is in constant use is warm or even hot, and my mom and aunt's kitchens were certainly that way.  So maybe they needed something to actually keep the yeast in check.  My 64 degree kitchen doesn't need any help.  It will keep yeast from "doing its thing" on its own.

And then there's this idea of  "lukewarm."  In my research, people suggested yeast should proof anywhere from 70 on the low end, to 105 on the high end.  I think the window is even more narrow.  I decided to experiment with temps, by placing yeast and sugar into some water at "room temperature" (my room temperature) and then bringing the temp up slowly to see where the yeast started to get happy.  Sure enough, even though I was starting out with warm water, by the time it hit the (cold) pyrex measuring cup and I added yeast to it, it was sub 70.  I placed my thermometer in the pyrex measuring cup and then placed the measuring cup in a bowl and began to incrementally add water from my instant-hot tap.  I was surprised to see that even around 75 degrees, not much was happening.  80 was better, but it wasn't until around 90 that things really started to happen.  So from now on, I will be sure that my yeast water is at 90 degrees.

The other thing I have to worry about in my cold kitchen is the temperature of the mixing bowl.  I didn't think that would make much of a difference (thinking it would only drop the dough's temperature a tiny bit), but I was wrong.  From now on I will be warming the bowl with hot water and then keeping it in an oven set for proofing.

The final element of fixing my dough-rise problems is actually using the oven to "proof" (placing the kneaded dough in an oven set at a relatively low temperature specifically for rising).  I had been doing this already, but not really paying much attention to getting the oven warm enough or keeping it there.


If you don't have an oven that does well for proofing, there are a couple of tricks you can try.  My oven doesn't really start keeping temperature until it's around 125 degrees, which is a bit too high.  Therefore, I set the oven as low as I can to where it will kick on and off (you can watch the indicator light or listen for the "click"), and then I just keep the door open a bit.  This will cause a greater fluctuation in temperature, so to combat that, I simply placed a couple of my iron skillets on the bottom rack to assist with keeping the temperature constant (the skillets act as heat sinks).  I used my thermometer to monitor things, and I'm able to keep the oven interior at about 100 degrees, which seems perfect to me.


Finally, and especially with the door cracked open, you will want to add an element to keep the rising dough's atmosphere moist.  A lot of people place a damp towel over the bowl, and while that helps a bit, I have started placing a shallow pan of hot water on the bottom rack where the iron skillets are hanging out.  Not only that, but I leave the water there when baking the bread, and I've found it really helps with the consistency and texture of the bread!


So that's it.  If you're having trouble getting your bread to rise, and you know your yeast isn't dead, chances are things aren't warm enough!
...

Wednesday, November 29, 2017

Bluetooth Problems with MacBook Pro Running Bootcamp (Windows)

For as long as I've been using my MacBook Pro, my Bluetooth has been abysmal. I run Windows via Bootcamp, but my wife uses her MBP as a Mac and she has the same problems (maybe worse). She got a nice little Jawbone Jambox Bluetooth speaker for Christmas and never even used it, because she couldn't ever get it to connect to her MBP (and for me to get it to work, it took some serious effort, and even then the performance was sub par).

I have several audio solutions set up around the house and studio, and Bluetooth is a fairly substantial part of the system(s), so today I decided to finally figure out what is going on, once and for all.

For those who come across this post with the same problem looking for a quick-fix answer, try this:

  1. Go to Device Manager > Network adapters > Broadcom 802.11n Network Adapter
  2. Right click and select Properties.
  3. Click the Advanced tab, go to Bluetooth Collaboration, and select "Enable" from the Value drop-down menu on the right.

After a lot of research, this seems to be the solution that works for most people.  And while it did help my problem, there are still major problems with my Bluetooth connection.

What it boils down to?  ANYTHING electronic (yes, I understand the computer is electronic, and that actually IS a factor!) will interfere with the Bluetooth Adapter's signal.  It really is just a matter of the Bluetooth hardware in earlier MacBook Pros being utter and total shite.

After I completed the steps above to enable Bluetooth Collaboration, I still had issues. I tried rebooting.  I tried altering other settings with both the network adapter and the Bluetooth devices (drivers on the MacBook as well as the devices themselves).  Then I remembered reading previously that a lot of people had problems with actual signal interference.  The MBP power block was sitting on the table (not near enough for me to think it'd be an issue, but still... on the table).  I moved it, and like magic, the music streaming over Bluetooth stopped stuttering.  But as soon as I started using my mouse (connected via wireless), the stutter started again.  So I unplugged the mouse receiver, but that didn't seem to help... and then I actually turned the mouse off via its physical switch, and the signal was smooth again... until I tried looking something else up on the web (using the MBP track pad instead of my mouse), when the stuttering started again.

So I am now better than where I started.  After enabling "Bluetooth Collaboration" for the network adapter, I can at least walk away from the laptop and stream a smooth music signal to my Bluetooth receiver and stereo.  However, if I touch the computer or put anything electronic anywhere near the MacBook, the signal will be interrupted and stutter like crazy.


Sunday, June 18, 2017

Hamilton Beach FlexBrew 49983 E03 Error

I recently picked up a Hamilton Beach FlexBrew (49983) at the thrift store for $8.  Not bad for a coffee maker that still costs $90 at Kohl’s, Target, Amazon, etc.

HamiltonBeach49983It worked when I plugged it in at the store, but after a thorough cleaning at home (without submerging!), when I plugged it back in, the display simply read E03.  Sometimes when you get these errors with various electronics, you can plug the machine in while holding down a button or combination of buttons, and the machine will reset itself.  I tried all kinds of combinations, and while I could get the error to change to E08, I couldn’t make it go away.

I assumed the error was a result of water getting in somewhere it shouldn’t have while cleaning the coffee maker, so I waited several days for the unit to dry out.  After three days, the E03 error persisted.

There is no information regarding this error (or any error) on the Hamilton Beach website, and from what I can glean from reports from customers who have contacted Hamilton Beach directly, they won’t tell you what any of the error codes mean.  It seems like Hamilton Beach should post a list of error codes so that people (or at least technicians) can diagnose what is wrong.

Since I couldn’t find any information on the web, I tore the machine apart looking for loose wires or broken solder connections, but I found nothing.

However, while working on the machine, some strange combination of actions “released” a bunch of water from the spout on the single cup side.  The water had not come out when I simply turned the machine upside down, but when I turned the machine over and over while looking for screws to open it up, I must have turned it in a way that allowed the water to come out.

So… it would seem the E03 error has something to do with water being trapped in a reservoir or tube somewhere, and that water can’t be drained simply by turning the machine upside down.  Thus, the “fix” is to turn the machine over and over in all directions,  until water comes pouring out of the single serve side spout.

Monday, February 13, 2017

Set Default Font in Illustrator and Photoshop CS6

Under “Window” in the top menu bar, select “Type > Character Styles.”

A pop-up window will appear.

CS6-Type-Character-dialog-box

Double-click “[Normal Character Style]” and another dialog box will appear.

Select “Basic Character Formats” from the list on the left, and you can define all of your default text properties.

IllustratorCS6-Type-Character-Basic-Character-Formats

Monday, August 29, 2016

Fixing a Samsung Ice Maker

One of the most popular posts on this blog is the “How to Defrost a Samsung Ice Maker” post.  In that post I outline how to defrost your Samsung Ice Maker using a “secret code” on your control panel.  You shouldn’t need to do that every week, but a lot of people do, because the Samsung SZAB001TA1 ice maker (which exists in refrigerators like the RF263BEAEW) had serious issues when it left the factory.

Fortunately, the issues can be remedied.  Unfortunately, Samsung is keeping the information under wraps, and it is extremely difficult to find any information on the subject.  Hopefully this post will help those of you looking for answers.

So first, here again are the steps for defrosting your Samsung Ice Maker using the control panel on the front of your fridge:

  1. On the front panel display, press the Energy Saver and Refrigerator buttons at the same time for 8 seconds.  The display will switch to the Test Mode and the display will go dark (all buttons, etc., will go dark) .
  2. Press any button within 15 seconds after the display has gone dark to scroll through the Test Modes as follows:
    • Manual operation 1 (FF)
    • Manual operation 2 (0F-r)
    • Manual defrost of fresh food compartments (rd)
    • Manual defrost of fresh food and freezer compartments (fd)
    • Cancel (display goes completely dark)

“fd” is the one you want.  The defrost mode will cause the refrigerator to beep the entire time it’s in effect (pretty annoying) and will shut off after five minutes (I had to do it quite a few times to thaw everything out).

When the Geek Squad Tech came to fix our ice maker, he also used a hair dryer to speed things up, but be careful if you go this route as you can actually melt the plastic housing and components and cause greater issues than you had before by deforming the plastic in your ice maker.

There are four things that need to be changed to make this ice maker work properly.

  1. The water fill tube needs to be adjusted.
  2. The thin gap between the refrigerator wall and the ice maker housing (bottom side of ice maker against fridge wall) needs to be sealed.
  3. The ribs surrounding the ice room fan air duct need to be removed with a utility knife (they cause water to puddle in the duct).
  4. Foam should be installed on to of the ice maker housing around the water fill inlet.
  5. If you have an older control board, the control board should be upgraded.

These issues are covered in a service bulletin that went out to Samsung Service Techs.  I got to take a look at the four page PDF, but our tech was nervous about getting in trouble if I actually posted the document on the web, so he only let me look at the doc. on his phone.

Since then, the document has found it’s way to the web.  An anonymous user actually posted the Service Bulletin document number in the comments of my original post on this issue.  So now I have a copy of the PDF here: ASC20150717001 (if you don’t trust the link, just search the doc. title on Google). 

Looking at the service bulletin is the easiest way to address everything, but I’ll lay things out here as well (though in less detail).

So, issue #1, the fill tube.  In the back of your Samsung fridge you can see the fill tube sticking out the back of the refrigerator.  This tube has a tendencey to slip, and after that happens water starts pouring all over the ice maker instead of just into the ice tray.  Thus, the first step in fixing your ice maker is making sure this tube goes where it’s supposed to, and then making sure it stays put.  Oddly enough, the tube often slips to far in (not out) and causes water to splash all over the place, so usually you have to actually back the tube out a bit and then secure it.

Issue #2.  This is an easy fix.  Simply take a tube of silicone and seal the gap.  It seems hard to believe this would be an issue, but I guess it’s why Samsung didn’t catch the problem earlier, and it really makes a difference.

Issue #3. (see service bulletin)

Issue #4.  With the entire ice maker out of the refrigerator, cut a thin strip of foam and glue it (silicone works well) around the perimeter of the water inlet area.  See photo below.

20160409_121521

Issue #4.  When I got fed up with Samsung “tech” (really just a bunch of people who have NO IDEA what they’re talking about reading scripts on the phone) and went to Best Buy and they put me on the phone with a Geek Squad guy in Minnesota who REALLY knew what he was doing, he listened to what I had to say, realized I had done some research and figure out what was going on, and thus just ordered every possible part that might need to be replaced to fix the issue and had them all sent directly to my house so the parts would already be there when the tech arrived.  Freaking fantastic.  One of the things that got sent was a new controller board.  The board has a lot more ports and resistors and what not.  I took a photo of the new board, but I’m having a hard time locating it.  Here is a photo of the OLD board.

IMG_20160829_091844

For what it’s worth, Samsung “customer support” is not support at all.  I spent hours and hours going through the same process over and over again (the person on the other end insisting on reading their script and asking me irrelevant, inane questions ad nauseum).  Each time, they would tell me someone would call me back soon, and each time, after a couple of days I would call back and there would be no evidence that I had ever called and the number I had been given was linked to no information whatsoever.  It was pretty infuriating.  I had to laugh when weeks after the matter was resolved (via Geek Squad, NOT Samsung) I received a letter from Samsung asking if I would like to purchase extended warranty services from them.  Unbelievable.

Some additional photos of the ice maker problems and fixes…

20160409_11185120160409_11190620160409_11192120160409_121134

Monday, April 25, 2016

The Easiest Way to Convert MKV to MP4 (MOV)

I recently wanted to do a little content editing of an MKV file.  I really didn’t want to spend time converting the file (and losing video and audio resolution), but every “trick” I could find online involved downloading software for demuxing, converting, etc. (things that take time, and mostly things that alter the original video –not to mention things that often come from shady sources).

So I thought about it for a bit, poked around in some of the (free) software I had readily available, and found a solution.

An MKV file is just a container.  Thus, I figured I could just change the extension (.mkv) to something else more “useable” (like .mp4) and mess with it that way.  Just changing the extension made Adobe Premiere unhappy (header issues), but as usual, VLC handled it just fine.  Not only that, but VLC ultimately turned out to be the solution for what I needed to do.

In VLC, you can save a file (right click the file in your playlist and select “save” from the list), and under the “settings” options you have “convert” and “dump raw input.”  First I tried utilizing the RAW option, but when it went to “streaming” after clicking “start,” there didn’t seem to be any progress, so I tried the next option.

Using the “convert” option, you can select pretty much any preset to do what we want to do, but I wanted an MP4 so I chose the first thing on the list:  Video – H.264 + MP3 (MP4).  Of course I don’t want MP3 for my audio (I want to keep the original file format), but don’t worry!  The next step is to click the tools/settings button next to the profile drop down. There you will see tabs for “video codec” and “audio codec.”  In each of those settings, you can choose “keep original video track” and “keep original audio track.” Once you do that, you simply click “start” and you’ll see your progress bar tick away.  It took me about four minutes to ouput a 2 hour movie that was originally 17.8 GB as an MKV.  However, the new file was now 11.4 GB, so obviously something had changed (and I assume resolution was lost, thought the file still looked pretty similar to the original).

I actually created a profile called MKV to MP4 wherein I selected the “original video” and “original audio” options with an MP4/MOV container, and the subsequent “conversion” took only around 20 seconds.  I had opened and closed VLC several times, but I suppose the conversion could have still been using cached files.

UPDATE: If the original audio format (like the audio in the file i was using) isn’t an audio format that VLC has in its output codec selection, trying to utilize the “original audio” option will create a file with no audio.  I’m not sure why it does this, but to correct for the problem, I changed my profile to convert the audio, and set up the audio as a high bitrate AAC with a sample rate the same as the original (48KHz).  The resulting file was a bit larger than the previous and took longer to output (because it’s actually converting the audio), but now has audio and can be imported into Adobe Premiere.

It turns out that the RAW dump is actually the better option if you’re trying to keep the file exactly like the original (just changing the extension), it just wasn’t showing me a live process when it was outputing a file.  I tried the RAW option again, and sure enough, after about four minutes (the same amount of time the above “convert” option took), I found I had an MP4 exactly the same size as the original MKV.  Unfortunately the file still wouldn’t work with Premiere, althought now i just get a “generic error” when trying to import the MP4 into Premiere.

Wednesday, February 17, 2016

Roku has a “Contra Code” Secret Screen for Wifi Antenna Settings

UPDATE (5-31-16): Gardner Lonsberry has created an info. graphic containing TONS more secret screens for Roku.  Scroll to the bottom to get the skinny.

Remember the Konami code that got you 30 lives in Contra (and other stuff in other games)?  Well there’s a similar trick for your Hulu Stick to get you to a “secret screen” with settings for the Wifi Antennas and a couple of other things.  It might not be as exciting, but it could be more useful (depending upon your priorities).

Up-Up-Down-Down-Left-Right-Left-Right-B-A

From the Home screen press…

  • Home x5 (press home button five times)
  • FF (not the pad arrow)
  • Down (on the arrow pad)
  • RW (not the pad arrow)
  • Down (on the arrow pad)
  • FF (not the pad arrow)

I was having a lot of frustration with the Roku in our kitchen dropping signal.  This is particularly aggravating, because when it happens the show you are watching disappears, then you have to wait a while for the Roku to reboot and get through the incredibly annoying “dancing Roku” screen, then you  have to navigate back to the content you were watching.  This is not fun when you’re just trying to watch something while quickly making a sandwich and getting back to work.

So after messing with the location of my router and trying to optimize it’s settings and power output, I went looking for tips on how to optimize signal reception for the Roku.  The Roku site basically blames your router and tells you to make sure it’s not by a window, in a sealed lead box (along with your kryptonite stash), or in your basement, but they don’t give you anything REALLY useful like the information here.

platform-secret-screen

The secret screen is labeled “Platform Secret Screen” and the first screen shows you how your Roku us currently functioning (temperature, IP address, SSID, Channel, N, RSSI, SNR, remote MAC address, remote battery level, etc.).  There are also options for System Operations Menu, Disable Travel Connect, WiFi Remote Menu, and WiFi secret screen.  Unfortunately none of these let you change the four dedicated content provider buttons at the bottom of the remote, but the WiFi Secret Screen is extremely useful.

wi-fi-secret-screen

On the WiFi Secret Screen there is a signal level meter for combined signal strength, antenna 1, antenna 2, and also a meter for glitch/sec.  This allows you to move around your Roku to optimize your reception.

This page also has Resets, Interference, Radios, and Power, so you can optimize your settings.

interference-mitigation

system-operations-menu

wifi-power-level

wifi-radio-controls

wi-fi-remote-menu

Setting my radios at TX 1 RX 1 kept my signal strength consistently at 22/23 (other settings were around 16-18 and fluctuated a lot more).  After trying different interference settings, I found “reduce non-WLAN interference” to be my best option.

Obviously your settings will depend upon your specific situation.

p.s.  If after getting things where you want them with your wifi reception you want to check the signal speed of what’s coming into your Roku, Vudu (a free channel with purchasing options for content) has a speed test under “info and settings.”

Props:

When searching for a solution to my Roku drop-out woes, I found most of this information on Richard Loyd’s YouTube channel here:  https://www.youtube.com/watch?v=k1GZO8e_KJo

The updated secret screen shown above is actually a lot more robust (there are more options, settings, and measurements) than the one Richard posted in his video from August 24, 2014.  This leads me to believe that Roku will be supporting and updating this feature into the future.

gqiwsuivaxuta2cspi3x

Wednesday, January 6, 2016

How to Defrost a Samsung Ice Maker

[UPDATE 8-29-16]: The solution, sent out to all Samsung service Techs in a bulletin, is in the new post on this subject here.

If you have a Samsung refrigerator with the SZAB001TA1 ice maker, you have a problem.

RF263BEAEWWWe recently purchased a French door refrigerator by Samsung (RF263BEAEWW) from Best Buy (heavily discounted as scratch and dent, $1,200 instead of $2,300… plus all the extra money for the extended warranty, etc.).  As usual, I researched this major purchase for weeks, and drove around to just about every major appliance store and outlet in Denver to see what I could find on scratch-and-dent-deep-discount.

While this fridge was the best rated fridge available (currently there seems to be a dearth of decent refrigerators on the market), it’s still had it’s issues, especially in regard to the compressor being astoundingly loud for a new refrigerator.  The biggest problem we’ve encountered so far is that it started making a “churning” or “chugging” noise and I quickly realized it was the fill pump for the ice maker.  The defrost was not working correctly and an ice dam was blocking the fill flow, thus the pump just kept trying to pump in water without ever quitting.  Not only was the noise extremely annoying, but it was going to destroy the pump if left to continue.

Samsung Ice MakerEvidently the ice makers in these units are HORRIBLE, and the circuit board that controls them is also awful (and fails if you look at it wrong).

Calling Best Buy gets you nowhere, as they will only direct you to the manufacturer if the appliance is still under manufacturer’s warranty.  Trying to get someone to come check out an appliance via Samsung will make you feel like you live in cold war Russia (trying to talk to the right person, trying to get someone to come to your house, getting scheduled for a visit more than a month out, etc.).

Rather than wait for someone to come fix it while putting up with the awful noise and having the pump fail completely while we waited, I ended up doing it myself, and that started with figuring out how to defrost the ice maker without having to turn off the fridge (and thus empty all the contents).

Here are the steps:

  1. On the front panel display, press the Energy Saver and Refrigerator buttons at the same time for 8 seconds.  The display will switch to the Test Mode and the display (all buttons, etc.) will go dark.
  2. Press any button within 15 seconds after the display goes dark to scroll through the Test Modes as follows:
    • Manual operation 1 (FF)
    • Manual operation 2 (0F-r)
    • Manual defrost of fresh food compartments (rd)
    • Manual defrost of fresh food and freezer compartments (fd)
    • Cancel (display goes completely dark)

“fd” is the one you want.  The defrost mode will beep while in effect (pretty annoying) and will shut off after five minutes (I had to do it quite a few times to thaw everything out).

Once the majority of the stuck-to-the-unit ice was thawed, I used a screw driver to carefully dislodge all the ice, then completed melted any chunks I couldn’t remove by hand with a hair dryer.  Finally I blew out the ice maker with an air compressor to remove any remaining droplets/moisture so it wouldn’t build up ice crystals once the unit was back on.

I’m not happy about this issue, and I really hope it doesn’t continue to happen, as returning a refrigerator is going to be a major pain (all the doors and drawers had to be removed to fit through the front door and kitchen door, not to mention the hassle of scheduling the process and storing food in the interim).

UPDATE 1-11-16: The ice maker is more of a problem than I had originally anticipated –more specifically, the way the ice maker is unable to defrost/thaw in an efficient manner).  There is a fairly permanent puddle in the bottom of the refrigerator, and often there is so much water it pours out of the front and onto the floor (and also into the bottom freezer, creating giant chunks of ice and icicles).  In fact, the water coming from the ice maker has ruined our floor (woke up one morning with a giant puddle on the floor that warped the floating cork, and I’m sure there is now mold under the flooring).

Here are some photos of the madness:

Samsung Ice Maker Issues 20151206_193432 20151207_152032
  20151206_193441  

UPDATE 1-17-16: The Samsung Ice Maker has failed again.  The genius who designed it decided that the defrost cycle, which happens on a regular basis, should drain directly into… the bottom of the ice maker housing.  Thus, this next time our ice maker failed (again, pouring water all over the floor and further damaging the cork flooring), the ice tray also froze completely shut, meaning I couldn’t get the ice maker drawer out without first thawing the ice maker (which meant the thawing ice had nowhere to go except all over the place).  There was nearly a full 1/2” solid sheet of ice holding the ice drawer to the bottom of the ice maker housing.  I spent around 2 hours fixing the problem tonight, and I have a feeling this is only going to get worse.  I really don’t want this refrigerator anymore.

Wednesday, June 24, 2015

Queuing Up Items to Watch Later in Plex Server

It is incredibly frustrating that there is no good way in Plex to click a button to add media to a “hopper” for watching later.  post-45536-0-49315800-1390566107I have a collection of hundreds and hundreds of movies.  Some I have watched part way through (and thus are automatically marked as either “read” or “unread” depending on whatever loony logic the Plex code uses).  Some have been added recently.  Some are favorites.  Some I simply want to remind myself I want to watch again without having to search through hundreds of titles to find them (or just remember I want to watch them again!).

None of these things really allow me to access these particular movies/shows quickly.

I have spent hours looking for a solution, and finally I have discovered the ONLY (seems crazy, huh?) way to do it, at least from the actual Plex Media Server (not one of their apps for a web browser or phone/tablet).

The short of it is this: you need to add the particular title to a COLLECTION.  Then, you can use a FILTER to find those particular titles.  You can’t add Collections to a Library, or your front page, or anything that would make SENSE, you can ONLY access a Collection via a filter.  It’s a pain in the *ss, but it’s the only way!

Here’s how accessing the collection works:

HOME > LIBRARY (click the library you want: movies, television, etc.) > OPTIONS (the three bars at the upper left will expand the side bar on the left) > COLLECTION (whichever collection listed under “FILTER” that you want shown).

You can add titles to a COLLECTION by either typing in the name of a Collection in the appropriate field of the title’s settings (where you view all the fields associated with a title), or you can go to the top-tier of the library (MOVIES, for instance), click SELECT ITEMS from the tool menu bar on the left (it’s the square with a check mark icon), then tick all the movies you’d like to add to a Collection.  Finally, click the icon of the folder and plus sign in the tool bar on the left, and select the COLLECTION to which you wish to add the titles (or create a new Collection).

Furthermore, once you do this, you should be able to access a “Collection” from your Roku, so you can relatively easily go to a list of your “queued” shows.  From the main Roku screen select the Plex channel > select a library from your Plex Library Sections > scroll down to “By Collection” > choose the Collection you want.  It’s a lot of hoops, but it’s the only way!

Unfortunately, since Movies and Television shows are stored in separate Libraries, you can’t access all queued items from one list (Collection).  You must view queued Movies and queued Television shows from their respective Libraries (totally ridiculous).  It’s also much harder to “bulk” add television shows since they are stored in sub-locations where the “select” option is not available (thus you have to add single shows to a Collection by typing the Collection name into the field under that particular show’s settings).

Turns out you can only add an ENTIRE SERIES to a collection.  You can’t add just a single episode, thus this method is worthless for adding single television episodes to your queue (again, REALLY Plex?  REALLY?!).

Wednesday, June 10, 2015

Red Giant MisFire Setting Definitions

The problem with MisFire is that I have NO IDEA what the different settings of each thing do.  I end up having to look stuff up every time, and when I do, I usually end up at this page, so I’m reposting here (basically so it’s easier for me to find!).

Major props to whomever posted this information online at:

http://www.aemoban.com/Source_Files/AE-misfire.html

I can’t figure out what the aemoban site is (the top tier is in Chinese), so I’m reposting the information here (because who knows when that page will disappear).  No copyright infringement intended.  Just making the information available to the filmmaking community!

=====================

MisFire Plug-ins

MisFire adds a host of tools to your effects arsenal to simulate film damage. The main MisFire plug-in is a single complete tool that offers 13 different effects. Each category of effect can be turned off individually using the category switch. The effects are: Fading, Funk, Splotches, Dust, Flicker, Vignette, Displacement, Grain; and 3 different types of scratches, Microscratches, Basic Scratches and Deep Scratches.

The main MisFire plug-in is accompanied by individual plug-ins for each effect category. For example, if you only want to apply grain and basic scratches, you can apply these as individual effects called Misfire Grain and Misfire Basic Scratches.

MisFire plug-ins are not a perfect duplication of every type of film defect. Film defects are wide ranging in their appearance and include problems caused by dust, dirt, film wear, duplication problems, splicing, irregular exposure or improper storage of the film medium. These defects can show up in the frame or be caused by improper projection. MisFire attempts to artistically emulate a number of these defects.

clip_image001


MisFire Fading

Fading causes an overall lightening of your image that is exhibited as lower contrast.

Fade Amount: The default value is 100, lower values will lessen the effect.

clip_image002

clip_image003


MisFire Funk

Funk provides for tone variation across the frame. This simulates a film negative with lightness variation across the entire frame that may be caused by improper storage or in an environment where fungus or mildew could form. This is similar to the splotches but occurs throughout the frame and will persist from frame to frame.

Funk Opacity: The default is 15%. High values may look unnatural but feel free to adjust to taste.

clip_image004

clip_image005


MisFire Splotches

Splotches manifest as a local dirtiness or discoloration of the frame. This can happen on any frame and will usually only persist for a frame or two at a time.

Number: Controls the number of splotches on any given frame where the scale controls the size. The Scale value at 1.0 will cover about 40% of a standard DV-size frame or about 16% of a 2K film frame.

Transparency: Controls the darkness of the discolored areas. You may need to lower the value on very bright footage (to make the splotch less prominent) or raise the value for very dark footage to bring out the effect.

Frequency: Determines how often a splotch will appear in a sequence. The default value of 50 will cause a splotch to appear on half of the frames. Try lowering this value if you want the splotches to occur less frequently.

clip_image006

clip_image007


MisFire Dust

Dust essentially draws bits of black and white material onto the frame. This is effect is similar to the small particles that appear on film that has been run through a projector numerous times. The defaults are meant to generate a small amount of both black and white dust that is very noticeable.

NOTE: While a number of categories include a Frequency control, each category determines its frequency separately, so splotches won’t necessarily appear at the same frame as dust or any other category of effect.

Black Dust Amount, White Dust Amount: Control the maximum number of black or white dust particles appearing in any one frame. For large frame sizes, you may want to make this value much larger to increase the appearance of the dust.

Opacity: Specifies the transparency of the dust particles. The default is 100%, which makes the particles quite noticeable. If you want the dust to look smaller in the frame, try lowering this value to between 40 and 60%.

Frequency: Determines how often a dust particle will appear in a sequence. The default value of 50 will cause dust particles to appear on half of the frames. Try lowering this value if you want the dust to occur less frequently.


clip_image008

clip_image009


MisFire Flicker

Flicker causes the image brightness to change from frame to frame. This is similar to the uneven brightness caused by the degradation of an old print.

Frequency: Operates the same as in the Dust or Splotches categories, where the value specifies the percentage of frames in a sequence that will have change. The default value of 50 means that half of the frames in a sequence will change in brightness.

Flicker Amount: Controls the degree of brightness change. The default of 10 will cause only a small variation.

clip_image010

clip_image011


MisFire Vignette

Old film tends to exhibit a lot of darkening around the edge of the frames, which is often a result of the lens and camera that were used to shoot the film. Vignette will mimic this aberration. Unlike other MisFire effects, Vignette does not animate or change from frame to frame.

NOTE: Magic Bullet Looks includes an integrated Vignette tool that you can use as a replacement for MisFire Vignette. The two produce similar results but Looks' Vignette can be integrated into a Look rather than applied separately.

Size: Controls the overall width of the darkening where a value of 0 will darken all the way to the center and value of 100 will not darken the frame at all.

Intensity: Simply changes the amount of darkening.

clip_image012

clip_image013


MisFire Displacement

Often old or mishandled film prints can exhibit a warping of the image caused by a physical bend in the film frame itself. Displacement offers a very simple control for warping the image.

Amount: Specifies the level of warping in the image. With this control, a little goes a long way. This category of effect does not auto-animate so you may want to keyframe the Amount value.

clip_image014

clip_image015


MisFire MicroScratches

MisFire offers 3 different styles of scratches. MicroScratches are very thin, faint black lines across the entire image. Film is often scraped as it run through a projector, creating faint black lines on the frame, and this damage is what is replicated.

Number: Does not correspond to the number of scratches, but instead is a measure of the density of the scratches—higher numbers yield a denser field of black lines.

Opacity: Changes the transparency of the lines. The Number and Opacity controls should be adjusted in tandem. If you raise the Number control, you may want to lower the Opacity, or vice versa.

clip_image016

clip_image017


MisFire Basic Scratches

Basic Scratches generates thin bright or dark lines that wiggle or move from frame to frame. Unlike the MicroScratches or Deep Scratches effect, Basic Scratches will not cover the entire frame but will gently fade toward the top or bottom of the frame.

Number of Scratches: The specified number of scratches that will be drawn on the image.

Maximum Duration: Controls the maximum length that any one scratch will appear on the image. The duration is determined randomly for each scratch and can be between 1 frame and the maximum specified number of frames.

Invert: Lets you specify either dark lines (when it is on) or light lines when it is off.

clip_image018

clip_image019


MisFire Deep Scratches

Deep Scratches generates a colored scratch that appears to have depth, and to wiggle or move from frame to frame. This colored scratch mimics a physical scratch on the film that has removed some of the film resist, letting light through that is pure in color. The scratches can shift left or right by a random amount that varies from 0 to 5-7 pixels, depending on the size of your image.

Number of Scratches: The specified number of scratches that will be drawn on the image.

Maximum Duration: Controls the maximum length that any one scratch will appear on the image. The duration is determined randomly for each scratch and can be between 1 frame and the maximum specified number of frames.

Tint Color: Specifies the color of the scratches. The default color is close to pure green, which is the color of real scratched film.

clip_image020

clip_image021


MisFire Grain

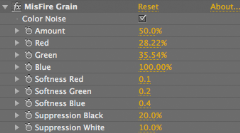
When most people think of film, they think of grain. While some film stocks do exhibit noticeable grain, this type of effect is best used sparingly. The Grain category generates more than just random noise. If all you want is random noise, a simply noise filter applied on top would work fine. The Grain controls go beyond this by letting you create the multi-colored clumps associated with true film grain. Grain offers ten different controls for specifying the amount of grain and where it appears on your image.

NOTE: Magic Bullet Looks includes an integrated Film Grain tool that you can use as a replacement for MisFire Grain. The two produce similar results but Looks' Film Grain can be integrated into a Look rather than applied separately and its speed is generally 3-4 times faster.

Color Noise: Lets you simply specify whether the grain is the same on all the color channels Red, Green and Blue. This control is on by default. If you turn it off, you will notice that the colored grain disappears and is replaced by a tinted noise, based on the Red, Green and Blue percentages.

Amount: Gives you control over the density.

Red, Green, Blue: These three controls specify how much grain appears and how soft it is. The Red, Green, and Blue controls are specified as a percentage and these bias the Amount setting. For example, the Red control defaults to 28.22%. This means that only 28.22% of the Amount value is used in the Red channel of your image. If these values are all the same, then the grain will have the same amount applied to each channel. They are interrelated and related to the Softness controls.

Softness Red, Softness Green, Softness Blue: These three controls let you soften the grain on each color channel. Smaller values mean harder edges, larger values add a more diffuse look. It is best to stick with small values in these controls. They are interrelated and related to the Color controls.

Suppression Black, Suppression White: These two controls determine whether the grain is drawn in purely white or black areas . The percentages specify the percentage of brightness or darkness in the frame where the grain will NOT appear. For example, 10% Suppression White means that the grain will not draw in the very brightest pixels in the image and will only appear fully in areas that are 10% or less of fully white pixels.
clip_image022

clip_image023


MisFire Gate Weave

When a film frame passes through a projector, sprockets outside the image area control the vertical motion of the frames through the projector. Over time, a film can be become warped or the sprockets can wear, causing the frame to appear to move side to side. This kind of motion is called Gate Weave and this effect mimics it.

Weave Frequency: Controls the speed of the left-right motion of the frame. Small values cause the frame to move slowly. High values will cause the frame to move quickly from side to side.

Amplitude: Measured in pixels. The default of 5 pixels will cause the frame to move left or right 5 pixels then return to center.

Noise Frequency: Varies the motion by the percentage you choose. Small values will cause a slight variation of the motion, while large values will cause the frame to appear to jitter.

clip_image024

clip_image025


MisFire Post Contrast

Film often appears with higher contrast than video. Over time the darkening or contrast change can be quite pronounced. The Post Contrast control lets you quickly add this effect.

Contrast: Applies a darkened high contrast effect. The default value is fine in most cases. Values beyond 50 will likely look unrealistic. Negative values can cause the image to appear to wash out.

clip_image026

clip_image027