Showing posts with label cool stuff. Show all posts

Wednesday, February 1, 2017

Five Months Later with The Droid Z Force

Man, I gotta say, other than size (which I will bitch about vehemently until they bring phones back down to the size of my original Droid Inc.), I am loving this Droid Z Force.

droid z force JBL tiltExcept for the most extreme high-use periods, I easily get two days on a charge, and when it drops down too low for my liking, it only takes about an hour to get it back to 100%.  The quick charge is amazing, even when using “slower” chargers like my Anker multi-port or my car charger (though these do have higher powered ports than average chargers).

Not only that, but the speaker mod, though a little bulky, contains a huge battery (and the added bonus of actually pretty decent sounding music on the go!).  I often just leave it on the phone, even if I'm not planning on using the speaker.  It still fits in my pocket nearly the same (obviously quite a bit thicker), and it actually makes the phone a little bit easier to hold onto (though it's not great in the car holder –too thick).  The phone with the speaker attached is kind of like carrying around a comfortably-edged (rounded), small Bluetooth speaker... except with the added bonus of a powerful phone/computer/browser/media player attached! And the kickstand on the speaker, which I use more often than I ever thought I would, is just icing.

Not only that, but for around $80 (or $30-40 if you want to brave the eBay gray market) there is a Qi (wireless charging) 2220mAh additional battery mod by Tumi/Incipio (which are now one in the same since Tumi licensed Incipio for a year).  You can go for days without charging!

The Google Pixel seems to be ruling the current mobile roost, but the Droid Z Force is spec'd pretty much the same, and all the apps that will "only" run on the Pixel actually run on the Z Force as well (including all the VR stuff that I have no use for).  And though a lot of people think the Pixel camera is tops, I really think the Droid Z Force phone is great (and, for what’s worth, I make my living taking pictures).

I feel like I bought at the right time.  Any time you purchase a phone and they start the hard push with advertising four months later (like with my GS5), and then the specs are still as good as all the brand new phones coming out (like with my GS5)... I feel satisfied.

All this for a phone I got for absolutely free (w/ two year contract) because at the time everyone was going gaga for the Samsung S7.  Doggonit, I feel like a winner.

Cons:

  • not water proof (at the time I bought my GS5 I thought “water resistant” was a gimmick, but I actulally miss this about my GS5 –which I used to shoot 4K video UNDERWATER for eight hours!!!)
  • no cases, especially with varying sized Moto Mods, so no protection for the phone or additional mods; I installed a matte screen protector (which I prefer to a glossy screen anyway) and the screen is advertised as unbreakable, so there’s that, but the phone and mods are definitely showing some physical wear
  • size, always the size (bring back the original Droid Incredible!)
  • though not a con with the phone, I was extremely disappointed with the “Hasselblad” (apparently in name only) Moto Mod; it’s junk, especially compared to the Droid Z Force’s stellar native camera

Monday, September 19, 2016

Hasselblad Moto Mod is a Thorough Disappointment

I am a photographer.  Thus, I was pretty stoked to know when I purchased my Droid Z Force that there was a Hasselblad Camera Mod coming down the pike.

I waited patiently for nearly a month, and finally it arrived… and what a major disappointment it was.

hasselblad-moto-mod

Here’s the short of it: the Motorola Droid Z Force has a pretty decent camera with a 21MP sensor (some would argue the best camera phone currently available).  The Hasselblad has a 12MP sensor.  Pretty much the ONLY thing going for the Hasselblad Moto Mod is the “optical zoom,” but you can “zoom in” on a 21MP photo and have nearly the same amount of zoom as the 10x optical on the Hasselblad’s 12MP photo!

The Hasselblad has a 4.5mm to 45mm zoom (that’s why they call it a 10x zoom) which is basically a 25mm to 250mm 35mm equivalent.  The Droid Z Force has a 4.51mm lens, which is equivalent to 26mm on a 35mm camera.  So a 21MP photo can give you nearly the same “zoom” digitally at the Hasselblad’s max resolution of 12MP.  In other words, if you simply crop the Droid’s photo to half (crop a 21MP photo to the Hasselblad max pixel dimension of 12MP), you’re still at 10.5MP and your 35mm equivalent is 52mm (the Hasselblad optical zoom maxes out at 45mm).

Any positive review I’ve seen for the Hasselblad mod (they are never raving, only lukewarm) goes on and on about the zoom, but frankly… who cares when the zoom really doesn’t do much for you and everything else comes up short?

Hasselblad Moto Mod shortcomings:

  • Only 12MP sensor (phone has a 21MP sensor) and also physically smaller (1/2.3 inches vs. 1/2.4 inches)
  • minimum aperture of f/3.5 –are you kidding me?! Not only that, but it’s not fixed, and the variable goes all the way up to f/6.5!!!  By the way, the phone’s minimum aperture is f/1.8
  • Max ISO is 3200 (same as the phone)
  • lesser focus technology than phone (the Z Force utilizes laser and contrast auto focus with phase detection; the Hasselblad only utilizes contrast/phase detection)
  • bad 24fps video (choppy)
  • no video HDR (which the phone does have)
  • no optical stabilization for video
  • No 4k (which I don’t care too much about, but if this is an “upgrade” it should at least be able to shoot the equivalent of the phone to which it’s attached!)

And from what I’ve read in every hands on review I’ve seen, the focus is no faster than the phone (often the user says it’s slower), the shutter lag is much higher than the phone’s, and the quality of the photos isn’t really a bump since the phone already has a decent sensor and utilizes Moto’s “Deep Trench Isolation” technology to isolate pixel color.

Sure, the Hasselblad Mod can shoot RAW, but who cares, considering all the other shortcomings?

Please explain to me why I should spend $250-$300 on a “mod” that I have to carry around if it doesn’t IMPROVE the camera on my phone (or even come close to what’s already there!).  Just because it says Hasselblad?  If I’m shooting more than what the very capable Moto Z Force camera is capable of, I think I’ll just carry a REAL camera that actually gives me a reason to mess around with a second device.

Boo, Hasselblad.  You guys should be ashamed of yourselves for letting Motorola slap your name on a piece of garbage that doesn’t even work as well as the phone to which it attaches.

Tuesday, August 9, 2016

My First Couple of Days with the Motorola Z Force Droid

I REALLY wanted to buy a small phone for my next phone, but the Fates conspired against me.  The only option I had was the iPhone SE, and while I LOVE the size and design of the phone (I really love the hard edge and metal buttons and switch), I know I can’t live in an iOS world.  I would go mad.

The only other option on the market is the Sony Z5 compact, which I REALLY wish I could use, but it’s a GSM only phone, and I live in Denver and regularly travel into the mountains, so Verizon (CDMA) is really the only carrier I can use if I expect to have signal when I want it.

Thus, for my next phone I went with one of the LARGEST phones on the market. [frown]

motozForcestyleshell

I ended up purchasing the Droid Z Force, mostly because it was $108 (with two year contract and including tax) out the door at Best Buy (and they threw in the JBL speaker mod to boot).  With Verizon, there is a $40 activation fee that appears on your bill when you purchase a new phone… even at the Verizon store!  Evidently the only way to get that fee waived is to purchase and activate online with Verizon, which would have been a lot more expensive (full MSRP and no bonus mods).

Man... when any store tries to convince you that the monthly payment plan is the way to go, CHECK... THEIR... MATH!  Even with the "monthly line discount" they try and bait you with, if you do the monthly payment, you are paying full price for the device over 24 months.  That means you also pay the tax on the MSRP up front!  That alone was going to be $62, then the activation fee, then the full cost of the phone over time (meaning a higher bill every month).  Crazy business.

The Samsung Galaxy S7 was going to be $220 (with 2 year contract) plus activation, so I just went with what was saving me money, not to mention avoiding the awful one-two punch of the way Samsung and Verizon turn a great phone into a piece of crap with their bloatware (and I have been quite pleased with the "clean" environment of the Moto-verse).

As I mentioned, BestBuy was also giving away the JBL speaker mod with the Droid Z Force, and while it's not going to be loud enough for DJ-ing parties and weddings, it's actually a pretty decent little speaker and will be great for working on location and listening to tunes.  It has it's own battery as well, so that's great (I have read that the speaker battery can actually power the phone, so it's like a battery mod as well, but I haven't confirmed that yet –I have confirmed that you can charge the mod through the phone though).

While I definitely hate how big the Droid Z Force is (bigger than my S5 and probably the same size of the Note 5), I have to admit I'm loving the functionality and speed.  The Motorola fingerprint reader is stellar, and I love how you can use it to lock and unlock the phone one handed.  You can also choose to link it to other passwords and apps, which is nice (though I won't be linking it to my banking and purchasing apps).  They warn you that it's not as secure as a pin or pattern, but I assume that's because you can "lift" a print from the reader, so I'm trying to get into the habit of swiping my finger down after it registers, effectively wiping the reader clean of my physical print.

When I powered up the phone to activate it in the store, the battery was at 99%.  We were on our way into the mountains for a wedding, and the device ONLY comes with the turbo charger (no stand-alone USB-C cord to use with a car charger --you have to order that on your own, which is pretty of annoying since you don't have a good way to transfer files to/from a computer until you do that), so I had no way to charge the new phone except for plugging into a wall.  Even with doing all the initial syncing, playing with the phone and figuring out features, downloading all my apps, etc. (all over 3G and 4G/LTE because I had no wifi), the phone was still at 33% the next day's afternoon!  Way more than 24 hours on the factory charge with a substantially higher amount of use is pretty impressive.

Not only that, but I went from 25% to 100% in less than a half hour charge using the included turbo charger.

I have been using Qi wireless charging with my S5, and I actually love it, so I'm pretty disappointed that the Droid Z Force doesn't have wireless charging, especially since pretty much EVERY other "flagship" has it these days.  I guess the turbo charge will have to make up for it.  There is an external battery pack mod that will do wireless charging, but I’m not going to buy an extra mod just for wireless charging.

I do wish the phone was water resistant like my S5 and the S7, and I'm not sure why it isn't.  The Z Force only has three physical buttons, the card slot, and a USB-C port.  It seems like it would have been relatively easy to seal up.  They advertise that it has a water resistant outer covering, but isn’t all plastic and glass water resistant?  I’m not sure what that even means.

The camera is great so far.  There's a "pro" mode that allows me to set ISO (though not aperture and shutter speed), so I'm loving that.  Maybe there's an app that will allow me to access those extra manual features.  Also... the camera is 21MP, so I can actually do some zooming and still have "flagship size" (8-12MP) and quality on the zoomed image.

Hasselblad is coming out with a camera mod for the phone (there was actually a physical spot for it on the Z Force displace at Best Buy, so it must be coming soon).  I'm interested to see what the price will be and how much higher the quality is (it will supposedly do RAW and will have a 10x optical zoom).  It seems weird to have to get a "better" camera mod for a phone that already has a 21MP camera, but we'll see.  Also, I'm not sure what the advantage would be to having a "mod" instead of a stand alone camera that will likely be the same size, but again, I guess I'll see.

I've read that though the screen is "shatterproof," that feature comes at the cost of being pretty scratch prone (the surface layer that keeps it together is soft), so I ordered a couple screen protectors.  I prefer a matte finish on my screen anyway (no glare and a more pleasing tactile feel).

I'm also trying to figure out which case to get.  I can't imagine not using a case on a phone to protect from scratches and dents, but the PITA about the "mods" on these phones is they won't attach if the phone is sporting a case.  Thus, I need to find a case that is easy to take on and off, and that can weather the abuse of constantly taking it on and off, so I'm able to attach mods when I want.  To me, this is the biggest draw back of the phone (other than it’s size).

There is also a "style shell" that is just a faux wood back.  I guess it looks pretty cool, but it really just adds thickness (almost doubles the thickness of the phone), so I'm not sure what the point is, other than looks (which don't matter if you're using a case).  If the "mod" doesn't really offer any protection, it's seems kind of stupid compared to a case that would protect the back, edges, and front (with a raised lip).

Again, I HATE the size of this thing.  It would be awesome if it were the size of my original Droid Incredible. But everything else about the phone seems pretty great so far.  And I really can't get over how much I'm loving the finger print reader to turn the phone on and off "securely."  Not having to enter a pattern all the time is really nice.  It's actually got me locking the phone every time I turn the screen off, vs. setting a longer time out to lock the phone for reasons of convenience (and making the phone less secure).

Tuesday, November 17, 2015

My Next Phone Will Be a… Sony?

UPDATE (1-14-16): Unlocked versions of the Z5 and Z5 Compact will go on sale in the us on Feb. 7 for $600 and $500, respectively. Now I just have to decide if I'm going to make due with my awful GS5 for now and keep waiting for the Z7, rumored to have a Snapdragon 820 chip instead of the 810 (the 810 has it's fair share of problems compared to the 820).

I am SOOOOOO sick of these GIANT phones they keep cramming down our throats.  If my HTC Droid Incredible had 4G/LTE I would be in heaven.  I would immediately switch back, old processor and almost no RAM be damned.  I long for the feel of that tiny and wonderful little powerhouse (at the time it came out) in my hand and pocket.  When I’ve been using my Samsung Galaxy 5 and then pick up my Droid Inc., it feels like I’m holding a matchbook.

I’m not quite ready to go “watch small” (plus, I wouldn’t be able to live without a really decent camera on me), but I can’t take these dinner-plates-as-phones any more!

Not only that, but I’ve been EXTREMELY unhappy with my GS5.  I’m not sure if it’s Samsung’s fault or Verizon’s, but the user experience on this powerhouse of a piece of hardware is just abysmal.  Never have I had a device butt-dial like the horrible GS5.  If someone texts, the phone wakes up… in your pocket.  I’ve actually had my phone dial Australia (among many, many, many other super-annoying things).  There is no way to disable this HUGE problem short of completely disabling ALL text message notifications.  If you want to know that your phone received a text, it will wake up in your pocket and dial your grandmother.  Period.

There are a bunch of other gripes about the phone that I won’t go into in this post, but what seemed on paper like it would be the best phone ever has just turned out to be a horrible, horrible user experience.  Not a day goes by that I don’t complain about how much I hate using the Samsung Galaxy S5 (even though I did use it to shoot an underwater film at 4k, which was a pretty crazy thing when the phone first came out).  I actually have a second GS5 that I rooted, and that’s better (though far from perfect), but it’s such a PITA to root and maintain a phone, especially once the GS5 upgraded to Lollipop, that I’m just ready for a new phone.

Wading through the possibilities, I find that the only phones available are these giant, god-awful eye sores that you can’t use with one hand (and I’ve got pretty big hands!).

Xperia_micro_1

If this Sony Xperia Micro concept phone designed by Dwight Looi were real, there is no question it would be my top choice for my next phone.  But since it’s just a concept, I’ll have to settle for the slightly larger Xperia Z5 compact.

Sony-Xperia-Z5-Compact-Unboxing_5-640x362

What do I like about the Z5 compact (other than the fact that at 4.6” diagonal it’s the smallest “flagship level” smart phone you can get in the US right now?):

  • Snapdragon 810 Octacore 64bit processor
  • 23MP camera (5MP through the screen front camera with 1080p video)
  • 4K video
  • Fingerprint reader in the power button (that supposedly actually works well, unlike my Samsung)
  • Water resistant (without the awful usb and headphone port flappy-crappy cover that my Samsung requires, which makes it basically NOT water resistant)
  • It’s boxy! (rounded edges look like preschool toys; give me razor sharp edges any day!!!)
  • rapid charge
  • dedicated camera button
  • supposedly .03 second focus speed?! (we’ll see – this article says it takes 3 or 4 seconds to load the camera app, so a .03 snap time doesn’t really matter if the camera won’t open quickly)
  • Best battery life in class (and since the compact has a smaller screen, it gets even better battery time than the Z5 even though the battery has a slightly smaller capacity)
  • up to 200GB microSD card
  • Cat 6 download LTE speeds on model E5823 (some models only have Cat 4)

It’s still going to have Sony bloat software (some of which you can supposedly disable), and since I’m on Verizon I’m sure they’ll crap it out with a bunch of garbage, but at least Android is doing a decent job of letting you disable a lot of Verizon’s atrocities.

It sucks that only the larger model is available in metal, but at least the Compact is matte plastic (not the shiny, slimy, plastic that most manufacturers are opting for these days).

Yes, the Z5 cameras don’t have optical image stabilization (though it does have Sony’s “SteadyShot”), but that seems to be the only reason the camera loses to the GS6 and LG G4 in camera comparisons, and supposedly the Samsung GS7 will be adopting the current Z5’s sensor.  So while Sony is KILLING IT in the photo/cinema world right now (low light sensitivity in the mirrorless AR7II is mind boggling), for some reason they aren’t putting that same “HOLY SH*T!” oomph into the cameras on their phones… but I think they’re still pretty damn good.

Oh… by the way, the Z5 Premium will be released later this year with a 4K display… on a phone.  Who the f*ck cares about a 4K screen on a phone –especially if it makes the phone HUGE, which is the biggest problem with today’s phones in the first place?!

Wednesday, June 26, 2013

“Stratospheric” (the new video from Story of the Running Wolf)

The best thing on the internet just went live today. Hardy Howl Films presents this nostalgic gem for the LA duo Story of the Running Wolf. I’ve embedded the video below, but do yourself a favor and watch it in 720p full-size to enjoy all the glory of the especially well done film-to-video-transfer and 80’s-television-look goodness.

Story of the Running Wolf is Josh D’Elia and Jeffrey Chernick.  While other acts may be attempting a return to all things 80’s, D’Elia and Chernick do it with a precision and flair that leave all others in the dust.  Not only that, but they are not simply imitating the past with covers (like most 80’s-return bands trying to access via corny, clumsy comedy), but are instead writing their own original material that could easily and seamlessly mesh with any video line-up circa 1983 MTV.  Think Naked Eyes, Asia, A-Ha, Depeche Mode, Duran Duran, New Order and you are on the path to Story of the Running Wolf.  These guys remind you what the 80’s was all about.  When you see and hear them one might first be tempted to cringe at just HOW MUCH 80’S they have conjured, but NO ONE who was alive in that decade can resist the mysterious day-glo neon and checkerboard-bad-3D-cool that some how sucks you in (because it IS cool whether you like it or not).

The video for “Stratospheric” is a mash-up of originally imagery in the style of The Never Ending Story (they made a freaking LUCK DRAGON!) and Labyrinth.  Let me just say that D’Elia as Bowie is spot on, but literally each and every visual element and piece of the story does it’s part to transport the viewer right back to a time when Aquanet was as ubiquitous as OP.

Even the motion logo at the beginning of the video got my pulse pumping with nostalgia.  The way D’Elia (who did much of the post work on the video) and Hardy Howl captured the “Sit, Ubu, Sit” and “Stephen J. Cannell Productions” feeling (remember the guy pulling the piece of paper from the type writer and flinging it into the air so it turns into the “c” of the logo?), right down to the warbly audio and cheesy-quasi-industrial video music queue, is just perfection.

Perhaps the best thing about this video, however, was how it transformed a room packed full of LA-hipster-douchebags at the Sayers Club in Hollywood last Saturday night into a screaming mob of 8-year-old little girls.  It was magical to see the mass of scarf-wearing (IT’S 90 DEGREES OUTSIDE!!!), pretentious a-holes drop their guards and literally scream with joy when the music started pulsing, the video rolled, and FREAKING FALCOR came flying across the screen.  Not even the scenester elite could deny the awesome.  The performance from Story of The Running Wolf that followed the video’s premier was nothing short of magical (and was mystically enhanced by the AMAZING and legendary sound system at the Sayers Club).

And kudos to the folks at Hardy Howl for bringing CUPCAKES to the event! The staff didn’t know what to do with themselves (the manager commented that no one had brought food to the club… ever) except abandon their reserved cool and climb aboard the life-sized Falcor that Hardy Howl brought to the club for PHOTO OPPS!!! Seriously… slutty club girls sans underpants with faces filled with a joy and innocence that would have brought tears to their daddies’ eyes.

If you EVER get a chance to see Story of the Running Wolf live, do NOT miss the opportunity. And if you can see them at the Sayers Club (this was their second performance at that venue), do anything and everything you can to hear them amplified by electronics that I can only assume involved some sort of pact with the devil.

A new album (including “Stratospheric”) is slated to drop in the near future, so for now you’ll have to sate your SOTRW hunger by downloading the single from iTunes and watching the video over and over and over again.

Alternatively, you can catch the tasty flava of Story of the Running Wolf in the remixes they’ve been doing at the behest of various bands on the LA Scene including an upcoming remix for Fitz and The Tantrums.

Wednesday, January 23, 2013

Green Glue Acoustic “Glue” Sound Dampening

I am finishing up building a music/film-editing studio, and one of the final steps of construction (before I start appointing the interior and gadgets) is finishing the walls… which is to say, finishing the acoustic enhancement to “typical” walls.  This involves two layers of 5/8” drywall with a special layer of “magic” in between.

The magic is called Green Glue.  The name is a bad choice (Green Goo, perhaps… or maybe Oobleck, if they  could get the rights from Dr. Seuss), because it’s not glue at all, and this seems to confuse a lot of people.  You can’t use GG to adhere the two sheets of drywall.  It doesn’t work anything like construction adhesive (i.e. Liquid Nails).  This actually comes up quite a bit in forum discussions, but the fact of the matter is that if you used Liquid Nails in the same way you would Green Glue, it’s likely that your acoustic dampening would actually be reduced instead of increased. Liquid Nails becomes rigid when it dries, so it is possible that it would simply turn your wall into a giant drum head, actually increasing reverberation and reflection (no absorption of sound waves, and instead more reflection).

Green Glue claims that their product converts vibration into heat.  It remains flexible, and thus absorbs sound waves/vibration rather than allowing them to reflect back or transmit through the wall material.

My research regarding Green Glue actually began with this “why is it any different than Liquid Nails?” question –I was wondering if I could use Liquid Nails in the same way one would use Green Glue.  You can sift through hundreds of pages of third party technical data like I did, or, you can go the quick route and take my word: Green Glue is worlds apart from Liquid Nails.  If Liquid Nails was an elephant; Green Glue would be a Blue Heron (or perhaps a slug, considering the sticky goo factor).

After deciding that Green Glue was worthwhile (and worth the rather high price when compared to Liquid Nails, which, again, is not even REMOTELY similar), I ordered a 5 Gallon bucket of the stuff from Amazon… probably a mistake.  I highly recommend going a more direct and productive route.  The attention and specificity you will get from someone who knows what they are selling (like Ted White, co-founder of Green Glue, now owner of The Sound Proofing Company) are worth their weight in gold… and you will actually get a BETTER PRICE on what you need (not to mention complete and detailed instructions, vs. just a bucket in a box).  The only downside is you have to actually communicate with a human. The Sound Proofing Company won’t sell you anything until you fill out a little online form telling them about your project, and then wait for someone to get back to you. Not a good system for impatient people who don’t like talking on the phone –like me (which is why I ordered from Amazon before realizing the above route might be better).

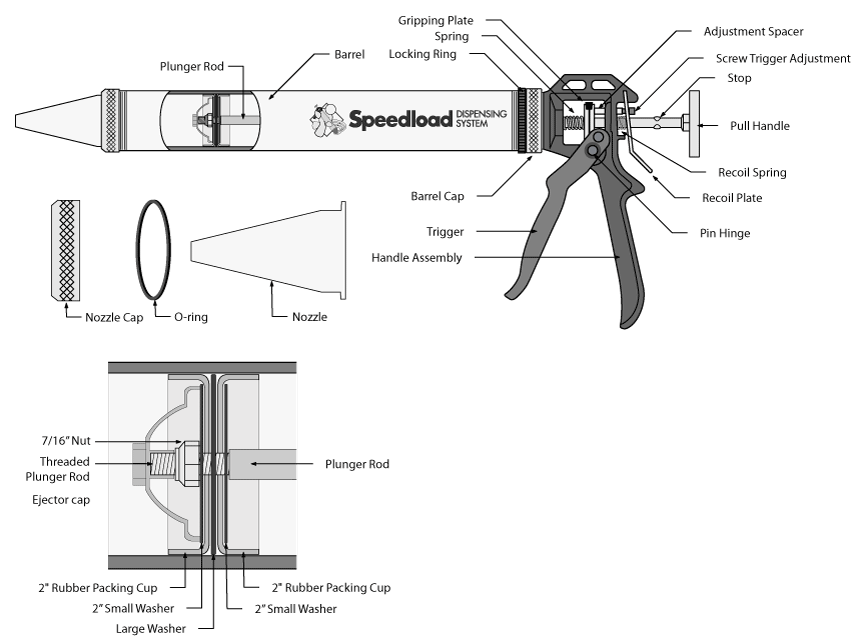
I paid $215 plus $15 shipping for the 5 gallon bucket on Amazon.  Ted tells me he sells a 5 gallon bucket for $198.  Here’s the kicker though… on Amazon, the special applicator (a 32 oz., specialized caulking gun called a Speedload Dispenser) sells for $56 plus shipping.  Ted let me know his company sells the gun (which he helped develop) for only $29 (though their website indicates otherwise, so you’ll need to contact them directly).

I actually became acquainted with Ted because I was trying my damnedest to avoid purchasing that applicator.  I didn’t want to “throw away” $60 on an applicator that I would use once and never again.

I was hoping I could use a trowel to apply the Green Glue, and this method is actually encouraged by several “licensed” resellers of the product.  I can assure you, the guys who invented the glue and a bunch of other people who chimed in on the message boards get REALLY upset when you talk about using a trowel.

The consensus is that you are supposed to use two loads of Green Glue from the Speedload Applicator with the tip cut to 3/8” and a bead applied in a spaghetti type pattern.  PERIOD.  No other application method will deliver the desired results.  I’m serious, guys.  The people who claim to know the most about this product will get REALLY PISSED OFF if you try and go any other route (I got pretty beat up on several message boards). Seriously. They get really mad… which is weird, because the manufacturer of the product and many, many other official resellers say it makes NO DIFFERENCE whatsoever what pattern you apply the glue, and also what thickness of bead should be used.

For what it’s worth, the written materials that come with the tubes tell you to cut the nozzle to 3/8” and apply one load in one direction and the second load in a perpendicular direction (no mention of spaghetti or any sort of randomness). The Speedload Applicator comes with nozzles pre-cut to 3/8”.

The literature that comes with the applicator also clearly states: “…Lines, squiggles, plops, etc. The pattern isn’t an issue, it’s the amount being used. The Green Glue needs to be roughly even across the board.” They even show one example pattern that is extremely uniform… which supports the use of a trowel. And one of the photos of the application shows Green Glue literally just “plopped” onto the drywall.

The “makers of Green Glue” (the people now running the company) could clearly care less about the application pattern of the product.  They also think 1/4” is fine for the bead.  Or 3/8”. Or whatever. Another site, SoundIsolationStore.com, says: “A larger tip opening on the nozzle to speed up application will still yield the same results as applying Green Glue Compound with a smaller bead.” They go on to say: “No specific coverage pattern is necessary to ensure excellent results.  Apply at least semi-evenly over the correct amount of square footage per tube and you will succeed.”

This YouTube video DIRECTLY from Green Glue Company, LLC (“copyright Green Glue Company, LLC 2008”) shows a person “spooging” Green Glue onto drywall in streams and globs.  Not the spaghetti technique.  Not the two directions technique. And very much NOT a uniform bead of Green Glue (anywhere from what looks like 1/4” thick to maybe nearly 2” thick).

This video directly from the Green Glue Company website regarding installing GG with the speed gun applicator from a 5 gallon bucket says you should cut the nozzle to 1/4” (not 3/8” like I was told is a MUST). It should be noted for shits and giggles that  the hole the guy cuts in the nozzle in the video looks like you could drive a truck through it.  This video directly from the GG website regarding installing with 28 oz. tubes also says 1/4” (not 3/8”). Both videos show the person applying a straight line “2 to 3 inches from the edge” all the way around the perimeter of the drywall sheet before treating the rest of the board. The “5 gallon bucket” video also says you should pull the plunger on The Speedload Applicator 2-5 times before starting in order to lubricate the gun, but makes no mention of adding any lubricant.  To my knowledge, the guns don’t come pre-lubed, and in fact, the instructions that came with mine make a rather lengthy point of how to add WD-40 at various places to lubricate the gun before beginning. This 5 gallon bucket video also notes that one tube of GG is only about 70% as effective as two tubes.  Both videos go on to say “the application pattern does not matter so long as you have distributed the compound evenly across the drywall.” I got SO MUCH SHIT on various discussion boards for asking WHY the spaghetti pattern was the only way to do it. (Also, the idea that the application pattern doesn’t matter leads me to believe that applying with a trowel is totally fine).  The video also says that no treatment of the first layer of drywall is necessary (I mudded all the seams on my first layer, and I don’t regret spending the extra time), but that the second layer should be staggered (to overlap the previous layer’s joints).  Finally, they recommend a quarter inch gap is left between all edges of your second layer of drywall so you can apply acoustical sealant –but then make no mention of whether or not you are supposed to mud over that, or if you then just paint the “acoustic goo” sealed seem, which I can only assume would be extremely obvious looking (not a “finished” look). [UPDATE] From SoundIsolationStore.com: “Step 4. Seal Your Wall Once the topmost layer of drywall is attached, seal the wall thoroughly using Green Glue Sealant or a comparable high quality acoustic caulk. Tape and mud your seams as you would normally do, and prepare for your wall finishing.” If you have staggered your drywall so that the top layer seams are flush against a solid piece of drywall (not lined up with the lower layer seam), I’m not sure why this would be necessary, but it is what it recommended. The literature that comes with the Speedload Applicator says, “Dedicated high performance rooms such as recording studios and theaters often specify the use of acoustical sealant in corners and along the floor. You can alternately use drywall compound to make sure all gaps are filled.  The goal is to make the room has as air tight as possible. [sic]” It should be noted that the Speedload literature also goes so far as to say THEY DO NOT RECOMMEND taping and mudding the first layer of drywall.

NOTE: All videos and literature say you need to apply the drywall with screws within 15 minutes of applying the glue.

For what it’s worth, I still think there’s merit to the trowel method if you are applying Green Glue in cooler temperatures. I wouldn’t try using a trowel when it’s warm out or if it’s warm in the room (the GG will be too viscous), but when my studio was at 50 degrees Fahrenheit and the product was much thicker and tackier, the GG spread perfectly with a trowel (see photos below).  A 1/4” tooth would be perfect for Green Glue’s recommended bead size, and applying it in two opposing directions seems like it would work great.  It’s not a totally random pattern, but according to Green Glue, that really doesn’t matter.

Ted White says Green Glue needs to be applied at around 70 degrees Fahrenheit for proper compression, and while I believe him (especially since he was around for all the testing of the product), the literature that comes with the glue and on the GG website makes no mention of this.  Somehow the temperatures here in Colorado reached 70 degrees Fahrenheit this January (no kidding!), so I ended up using the Speed Gun Applicator, but had the temperatures remained cold, I would likely have spent less time trying to bring the ambient temperature of the studio-under-construction up to 70 degrees, and would have gone with the trowel (ESPECIALLY since the Green Glue site and many others say the thickness of the bead and the application pattern are both completely irrelevant as long as you use the correct amount and get even coverage).

GreenGlue IMAG2043

Green Glue applied with trowel (ambient temperature around 50 degrees Fahrenheit). This stuff will definitely make a sticky mess if you’re not careful.

The same board two months later. Bead width intact. Product “dried” (sticky to touch, like a Whacky-Wall-Walker, but leaves no residue). Notice how the product is now green instead of just minty white.

Thursday, March 8, 2012

Bloom Fresco High Chair Review (mostly a cathartic purge)

Update: Now that our kiddo is eating real food, I wouldn’t wish this chair on my worst enemy.  Yes it looks cool, but it is COMPLETELY IMPOSSIBLE to keep clean.  I am a neat freak, and even I have a terrible time getting this thing even remotely clean.  There are more nooks and crannies than you can imagine, the straps are like food magnets that capture grime, and there are levels upon levels that you must take apart to clean (seat pad, booster seat, straps, panels, etc.).  Yes, I read the reviews that said the chair is hard to keep clean, “but I’m me!” I naively thought.  HEED MY WORDS: this chair is impossible to keep clean.  Stay away.  RUN away!  If you’re into spending $400 on a cleaning challenge, get a pet porcupine.

WARNING: There is a lot of cussing in this post.

This review is largely a cathartic rant, but I do provide some top secret information, so hopefully it will help prevent someone out there from destroying a really expensive high chair.

When registering for baby stuff, the one thing we were sure of was that we had to have the Bloom Fresco high chair.  Who cares if it’s $400?  We needed it!  It would make our baby look like a brilliant astronaut a la 2001, and it matched our Saarinen chairs in the kitchen perfectly!

bloomFresco

Saarinen-Tulip-Armchair-2-470x265

So all our friends banded together, chipped in, and bought us the Fresco.

Even though the seat originates in Germany, they obviously hired a nit-wit from Ikea to write/illustrate the instruction manual.  My biggest gripe is that they reference things without defining them (my lawyer friends would be FURIOUS).

There are many things you will scream when trying to figure out your Bloom high chair.  I have highlighted some below, and hopefully provided some answers that will prevent you from flying into a rage and/or destroying a $400 high chair.


HOW THE F**K DO I TILT THE SEAT?!

Why they don’t simply tell you that there is a lever inside of the recessed handle at the TOP of the BACK of the chair I have NO IDEA.  This seems like an easy enough thing to say or illustrate.

IMG_0071

Instead they lead you to believe that the little gray levers on each side where the chair pivots (which would make sense mechanically) are what allows the seat to tilt back and forth.  Those levers are only for raising the seat up and down (NOT tilting).  One time we got luckily and my wife accidentally got the seat to unlock and move back into the bassinet position (she didn’t realize she had pressed the lever in the back of the seat), so we were fortunate enough to be able to USE the seat for the first couple months of the kid’s life before we needed a high chair.  And it’s actually a GREAT bassinet, so there is that positive thing I have to say.


HOW THE F**K DO I GET THE TILTED SEAT TO LOCK IN PLACE?

Once I figured out about the lever inside the handle (literally MONTHS after we owned the chair), I could finally tilt the seat back and forth, but for the life of me I couldn’t get it to lock in place.  The problem is that the handle/lever almost ALWAYS sticks.  You need to bang on it or try and pull it back down (like some sort of European finger puzzle) so that the chair will click into one of it’s three available positions (vertical, slightly tilted back, or bassinet).


WHAT THE F**K IS A “COMFORT NEST?!”

It’s a booster seat.  Why they don’t just call it that, I have no idea.  It’s made of plastic (not exactly the pinnacle of comfortable materials) and looks nothing like a nest.


WHAT THE F**K KIND OF BIZARRE BABY ARE THESE SHOULDER PADS MADE FOR?!

I finally realized we needed to remove the shoulder strap pads when my baby started choking because they were cutting off his airway. Perhaps they are of use with a larger child, but there is NO WAY these rigid (and huge) pads are good for a tiny baby (or even a 24 pound six month old).


WHAT THE F**K IS THE “SAFETY BAR, AND WHAT IS IT FOR?!”

The way the safety bar is described in the manual, one would think that it’s the little piece of plastic that holds the “Comfort Nest” in place.  It’s not.  It’s the silver metal bar to which the tray and the second tray (why two trays?) fasten.  When thinking about it as the thing that keeps your baby in the seat, it makes total sense to call it the safety bar.  When thinking about it in reference to what keeps the booster seat from sliding out of the chair, it’s entirely confusing, especially since there are two different things that can perform this function (not to mention a third thing that fits in the same hole, all shown in the photo below).

IMG_0062

It is important when installing the safety bar (the silver bar that holds the tray) that you clip the arms in place before securing the base of the vertical riser bar.

Again, there are white plastic hoops at the end of each safety bar arm (see photos above and below) that clip over the chair’s pivot points.  These must be clipped into place before you slide and clip the vertical riser bar in at the base of the booster seat/”Comfort Nest,” otherwise, the clips may not attach securely (snap into place), and the vertical bar will then be able to collapse.

IMG_0063

The vertical bar, which telescopes to change height depending upon the tilt of the chair (1st and 2nd position, not bassinet position), has no lock (which seems would be safer).  The vertical bar relies upon the position of the chair to prevent telescoping.  So again I tell you: the safety bar arm hooks need to be fastened securely into place to prevent the vertical bar from sliding up and down.  If these clips are not securely in place, the metal bar and tray can collapse and squash your kid’s legs if any pressure is applied downward on the tray.  I see this as a fairly significant safety hazard.


WHY THE F**CK CAN’T I TILT THE SEAT BACK WITHOUT HAVING TO USE OR REMOVE 40,000 EXTRA PIECES?!

Another huge gripe I have with this chair is the amazing INCONVENIECE with switching from high chair mode (with “Comfort Nest”) to slightly tilted back, to all the way tilted back.  When your child is first starting to use a high-chair, there will be MANY occasions when you wish to switch from high chair (with Comfort Nest/booster seat) to recline.  Bottles are difficult when sitting straight up, so you’ll want to tip the seat at least slightly back, if not all the way back.  Also, you won’t always want to use the seat just for feeding, so bassinet mode is still useful.

To switch from high chair for a baby (not toddler) to bassinet, you not only have to remove the booster seat, but also switch out the entire seat pad (there are two seat pads/covers, one for booster seat mode, one for bassinet/toddler mode).  This is obviously incredibly annoying, as you need to keep both chair pads/covers nearby to switch back and forth.

Originally I also thought you had to remove the safety bar to utilize the middle tilt position.  This is a massive pain in the butt if you just want to tilt the chair slightly back to give your kid a bottle, because it involves not only removing the tray and the metal “safety bar,” but also replacing the safety bar with the little plastic slider-hook piece (see photos above) that fits into the front of the chair to prevent the booster seat/Comfort Nest from sliding forward (so your child doesn’t end up on the floor).  Thus in order to simply tilt the chair back a few inches for bottle feeding, you have to make major changes involving multiple extra parts.  Incidentally, there is a secret compartment inside the chair to store some of the extra pieces, but not all of them… what the hell is this all about?!  Why give us a place to store only SOME of the things we need to always have on hand?!

Anyway, I finally figured out that the middle recline position (slightly tilted back) is possible with the safety bar in place, it’s just difficult to figure out, and the safety bar will be very much in the way of your child’s legs (he/she will either have to drape his/her legs over the bar, possibly cutting off circulation, or you will need to remove your child’s legs).  Originally when I tilted the seat back with the safety bar in place the white, round clips that fasten the safety bar to the chair would pop off at the two points where the seat swivels.  However, if you push the front vertical bar on the safety bar down while tilting the seat back, the safety bar can remain safely fastened to the chair, but again, the bar will be in the way of your kid’s legs.


WHY THE F**CK IS THE STORAGE PANEL BEHIND THE KID?!

The “secret” storage compartment in the back of the seat is clever, right?  Except that it’s NOT.  In order to access the panel, you have to remove your child and the seat pad, not to mention the fact that the shoulder and waist straps go through the seat pad which make accessing the storage compartment even more difficult!  Why not put this storage panel in the BACK of the seat, so you can actually USE IT?!  p.s. When installing the piece of plastic that keeps the “Comfort Nest” in place (the piece of plastic that protrudes through the storage cover) you will need to actually remove the panel cover (they sort of hint at this, but don’t really say it).  To do this, gently bend the storage tray cover so you can remove it at it’s pivot points.  DO NOT do this while you are angry or you will break the cover (luckily I had my wits about me at this point in the struggle).


WHY THE F**CK WOULD THEY MAKE A CHAIR ***MADE FOR FEEDING BABIES*** SO DIFFICULT TO CLEAN?!

This chair has about 3 billion nooks and crannies, so plan on spending a lot of time cleaning it (it’s not just a simple wipe down).  You have to remove straps and pads and the “Comfort Nest” and then scrub the food and goo out of the nylon shoulder straps (you’re child WILL put these straps in his/her mouth while his/her mouth is full of food).  You will likely ignore me (I ignored others that said this in reviews), but you’ve been warned.


All this said, if I had it to do all over again, would I still want this chair?

Yeah, I guess so, but only because there is such a dearth of cool high chairs for kids living in midcentury modern homes.  The fact that it can function as a bassinet and a high chair (and do it in style) is great, and it really does look cool. [oh, me]

Thursday, December 16, 2010

Best Way to Stream Audio Via WiFi

UPDATE: The information for "best streaming audio wifi setup" has been updated at my new post here.
I’ve been searching for the perfect wireless home audio set up for years.  I’ve got a beautiful Clairtone G2 in my swank 50’s living room that I use for my audio listening pleasure.  It’s not the most practical thing for setting up all your audio/video needs, but it’s so damn pretty, and goes so well with the rest of my midcentury modern furnishings that there is no getting around the fact that I have to make it work with my audio setup.
I started out years ago using a Creative Labs WiFi system.  I think it was actually called “Creative Sound Blaster Wireless Music.”  Sound Blaster of course went on to become a more generic term for Creative Labs computer audio cards (actually, I think this was the case even then, and it made the name of the unit incredibly confusing).  This was early wifi audio streaming.  When it worked, it was pretty cool.  The fact that the system had a remote that actually showed the name of the song playing, and songs in your library, and even playlists made the device years ahead of any other similar system, but it was S-L-O-W.  If you had any sort of decent music library (more than 200 songs), it was painful to scroll through your tunes.  Playlists were difficult to compile, and the server software crashed all the time.  Other than that it was grand!
For some reason, no one has created a similar unit at a decent price since this unit was made available around 2004.  The closest thing seems to be the SqueezeBox Duet, but it’s around $400 —which is WAY too pricey when you’re just trying to get audio to your old stereo.
There are some decent units under $150, but almost all of them have speakers incorporated into the unit.  I just wanted a good wifi box to plug into my stereo via RCA plugs.  Why does no one make this?!
I’ve finally found something that works for me, and it just goes to show: if you wait long enough, technology catches up and people make enough things that are “almost right,” so you can cobble together exactly what you need at the price you want.
I finally ended up just buying an old Airport Express off of eBay for $45 (they list for $99) and using it only to stream audio.  Because it’s only for audio, you can use G or even B wifi, so don’t waste your money on a faster N unit.
When I received my Airport Express, I plugged it into the power strip and ran a 1/8” to RCA cable from the unit to my stereo.  I downloaded the Airport Utility from Apple.com and followed easy steps that connected the Airport Express to my existing home network (selecting the options to use the Airport Express only for audio streaming). It was super easy, and I had music streaming to my G2 literally minutes after opening the Airport Express box.
I was happy to see that I can switch speakers from the iTunes interface (I am able to select one or more), and thus the music playing in my office is in perfect sync with the music playing in my living room.  You can even control the volume of each independently, so I can make the music louder in the living room, and quieter in the office.  Currently I have the audio in my office turned off so I can watch Hulu, but iTunes is still streaming to the living room.  I will likely add another Airport Express in the future so that I can stream music to my patio as well.
I use Jeff Sharkey’s TunesRemote for a remote control, which allows me to access my entire library and all my playlists from my phone.  HOW TO: Install the app on your phone (download from Android market), let it scan for your iTunes, click on the correct computer/network on your phone, the app will pop-up a four digit code, your device should appear in your iTunes window (same window in which your Playlists, etc. are displayed), click on your device in iTunes and enter the four digit code.  I’m listing all that, because I had trouble setting this up at first.
If you don’t like using iTunes, Rogue Amoeba makes a program called Airfoil that allows you to stream any audio to your Airport Express.  Basically Airfoil hijacks the audio from any program on your computer and then sends it to your Airport Express.  You can even send to multiple Airport Express devices (like you would with iTunes).  Don’t get all excited thinking that this will work with audio for your internet video though.  It will be out of sync, and there’s not a damn thing you can do about it (see this post).
So… I’ve got audio streaming to my G2, I’ve got a remote to control it, and I’m a happy, happy boy!


[UPDATE] I updated iTunes (always a big mistake) to 10.1 and can no longer connect to the Airport Express from iTunes.  Airfoil connects to the Airport without issue.  Don’t you just love it when a third party does a better job than the manufacturer? :eye roll:
[UPDATE] The issue above was completely firewall related.  Make sure you have an exception for Airport (not just iTunes).  I found that setting “protocol” to TCP (not UDP) made things work best. I should probably figure out what the hell that means.
best / cheapest / most inexpensive way to stream audio
wifi with vintage audio

Thursday, December 9, 2010

Watch Porn

I tend to get “precious” with cool things I find on the web… like if I tell people about it, there will be less for me (as if I can actually afford to “buy things”).  I’m trying to overcome this irrational psychosis by sharing things here… with you… right now.

Here is one of my most favoritest things.  A couple of years ago I had a bit of an E-bay addiction (my wife has since beaten coaxed it out of me)  --mostly chairs and sundry mid-century modern coolness, but the disease did net me a few wicked cool watches.  The time pieces I purchased were from a guy calling himself Watchismo.  Watchismo has since become an online store.  It is my porn.

Here are some examples (click to go to their pages):


The ones I bought way back when? From the Watchismo online museum:

1970’s Zeno Green Jump Hour (wind)My Zeno actually seems to be in better condition than the one pictured above… it was new old stock… and I don’t think I paid anywhere near what it’s listed for on the Watchismo site.

CIMG4145


1970’s Seiko Square Face (automatic/kinetic)

CIMG4141

Watchismo doesn’t have this one in their “museum.”

Monday, February 15, 2010

Electric Shelby Cobra

It’s just the prettiest car in the world (and by pretty, I mean incredibly fast), so it was only a matter of time before somebody started making them electric… and it looks like they’re just about as fast.

When I am rich, I will have one.  Oh, yes.  I will.

From Green Auto Blog

I will also have a diesel/electric 1964 Lincoln as my everyday driver.

<\fantasies>